Integrating Manipulatives and Animations to Visualize Holliday Junctions
Editor: Ellis Bell
Published online:
Abstract
The complex molecular architecture of Holliday junctions is often challenging for undergraduate biochemistry students to conceptualize. In particular, they have difficulty translating from two-dimensional, linear representations shown in textbooks to the atomic-resolution DNA structures. This challenge impedes their comprehension of the mechanisms by which proteins are able to bind, hydrolyze, and re-ligate the component DNA strands. We have developed an affordable, portable Holliday junction model using colored chenille stems (a.k.a. pipe cleaners) that students use to first visualize the DNA structures within Holliday junctions, and relate those structures to the static two-dimensional representations in textbooks. To fully integrate the linear depictions with the three-dimensional models, students then watch an online animated movie that models the dynamics of Holliday junction resolution. Students then use those models to work problem sets that include questions about double-stranded break repair, mating-type switching, and genetic crossover. The implementation of these personal manipulative models for each student has notably improved student comprehension of the molecular mechanism of homologous recombination.
Primary image: Representations of Holliday Junctions. Top row: a conventional line schematic of a Holliday junction, in which there are four heteroduplexes of double-stranded DNA, shown beside a cartoon representation of a Holliday junction solved by x-ray crystallography (PDB: 1DCW). Bottom row: a chenille-stem manipulative, which can be interconverted between the conventional line schematic and the open-cruciform structure that are depicted in the top row.
Citation
Lewis KA, Luxford CJ. 2020. Integrating manipulatives and animations to visualize Holliday junctions. CourseSource. https://doi.org/10.24918/cs.2020.37
Society Learning Goals
Biochemistry and Molecular Biology
- Macromolecular Structure Determines Function and Regulation
- What factors determine structure?
- How are structure and function related?
- Information storage and flow are dynamic and interactive
- How are genomes maintained?
Genetics
- Nature of Genetic Material
- What are the molecular components and mechanisms necessary to preserve and duplicate an organism’s genome?
Lesson Learning Goals
- Students will understand the relationship between multiple representations of Holliday junction structures.
- Students will be able to explain the role of Holliday junction resolution in repairing DNA damage and generating genetic diversity.
Lesson Learning Objectives
Students will be able to:
- Build representations of Holliday junctions using chenille stems.
- Describe the molecular details of heteroduplex structure in both Holliday junctions and resolved Holliday junctions.
- Correctly predict the outcomes of Holliday junction resolutions in terms of DNA structure and genetic crossover.
- State how the cell ensures high fidelity DNA replication and identify instances where the cell employs mechanisms for damage repair.
- Use mechanistic reasoning to explain how an enzyme or ribozyme catalyzes a particular reaction.
- Discuss the chemical and physical relationships between composition and structure of macromolecules.
- Compare and contrast the primary, secondary, tertiary, and quaternary structures of proteins and nucleic acids.
Article Context
Course
Article Type
Course Level
Bloom's Cognitive Level
Vision and Change Core Competencies
Vision and Change Core Concepts
Class Type
Class Size
Audience
Lesson Length
Pedagogical Approaches
Principles of How People Learn
Assessment Type
INTRODUCTION
Visualization skills are essential for student comprehension of the complex, abstract nature of physical sciences (1). Instructors often use visual representations like 2D pictures or animations to connect the abstract nature of chemistry with concrete visuals (2).
The ability to understand 2D representations of 3D systems is a critical skill in chemistry learning (3). To facilitate the development of these skills, many tactile models are widely used in high school and introductory-level college courses - e.g., molecular model kits in general and organic chemistry. However, for upper-level courses in which complex macromolecules figure prominently, it becomes more complicated and more expensive to model molecular structures. Students struggle to extract information from 2D representations commonly used in biochemistry instruction (4,5). Representations that simplify structural information of complex molecules can lead to fragmented understanding of macromolecular structures (6). In recent years, 3D printing has emerged as a valuable tool for creating tactile models of macromolecule structures (7,8). Even so, the dynamics of large macromolecules and biochemical processes can be readily conveyed using affordable and student-friendly methods (9,10).
We have observed that visualizing complex DNA secondary structures is a recurrent challenge for students in upper-level biochemistry and molecular biology courses. This issue is primarily encountered when discussing DNA strand invasion during homologous recombination, where two homologous double-stranded DNA molecules are conventionally represented by two sets of parallel lines (Figure 1A). The invading strand is depicted as a diagonal line that intersects with the displaced strand (Figure 1, C-F); as the diagonal lines cross each other to form an "X." This configuration is also called the "anti-parallel stacked-X" configuration (11). Students have difficulty placing "flat" representations of such structures, including Holliday junctions, into the three-dimensional context of the DNA double helix. Without this conceptualization, students then have additional difficulty in understanding the resolution of the Holliday junction into two separate heteroduplex DNAs. In particular, students are readily confused when trying to determine the outcome of Holliday junction resolution, often depicted as whether the "cut site" the resolvase enzyme is on the "top" or "bottom" strands of the line diagrams (Figure 1, E-F). Students report that they have difficulty understanding this kind of textbook diagram, especially how resolution can work when the "'top strand' is so far away from the 'bottom strand'".
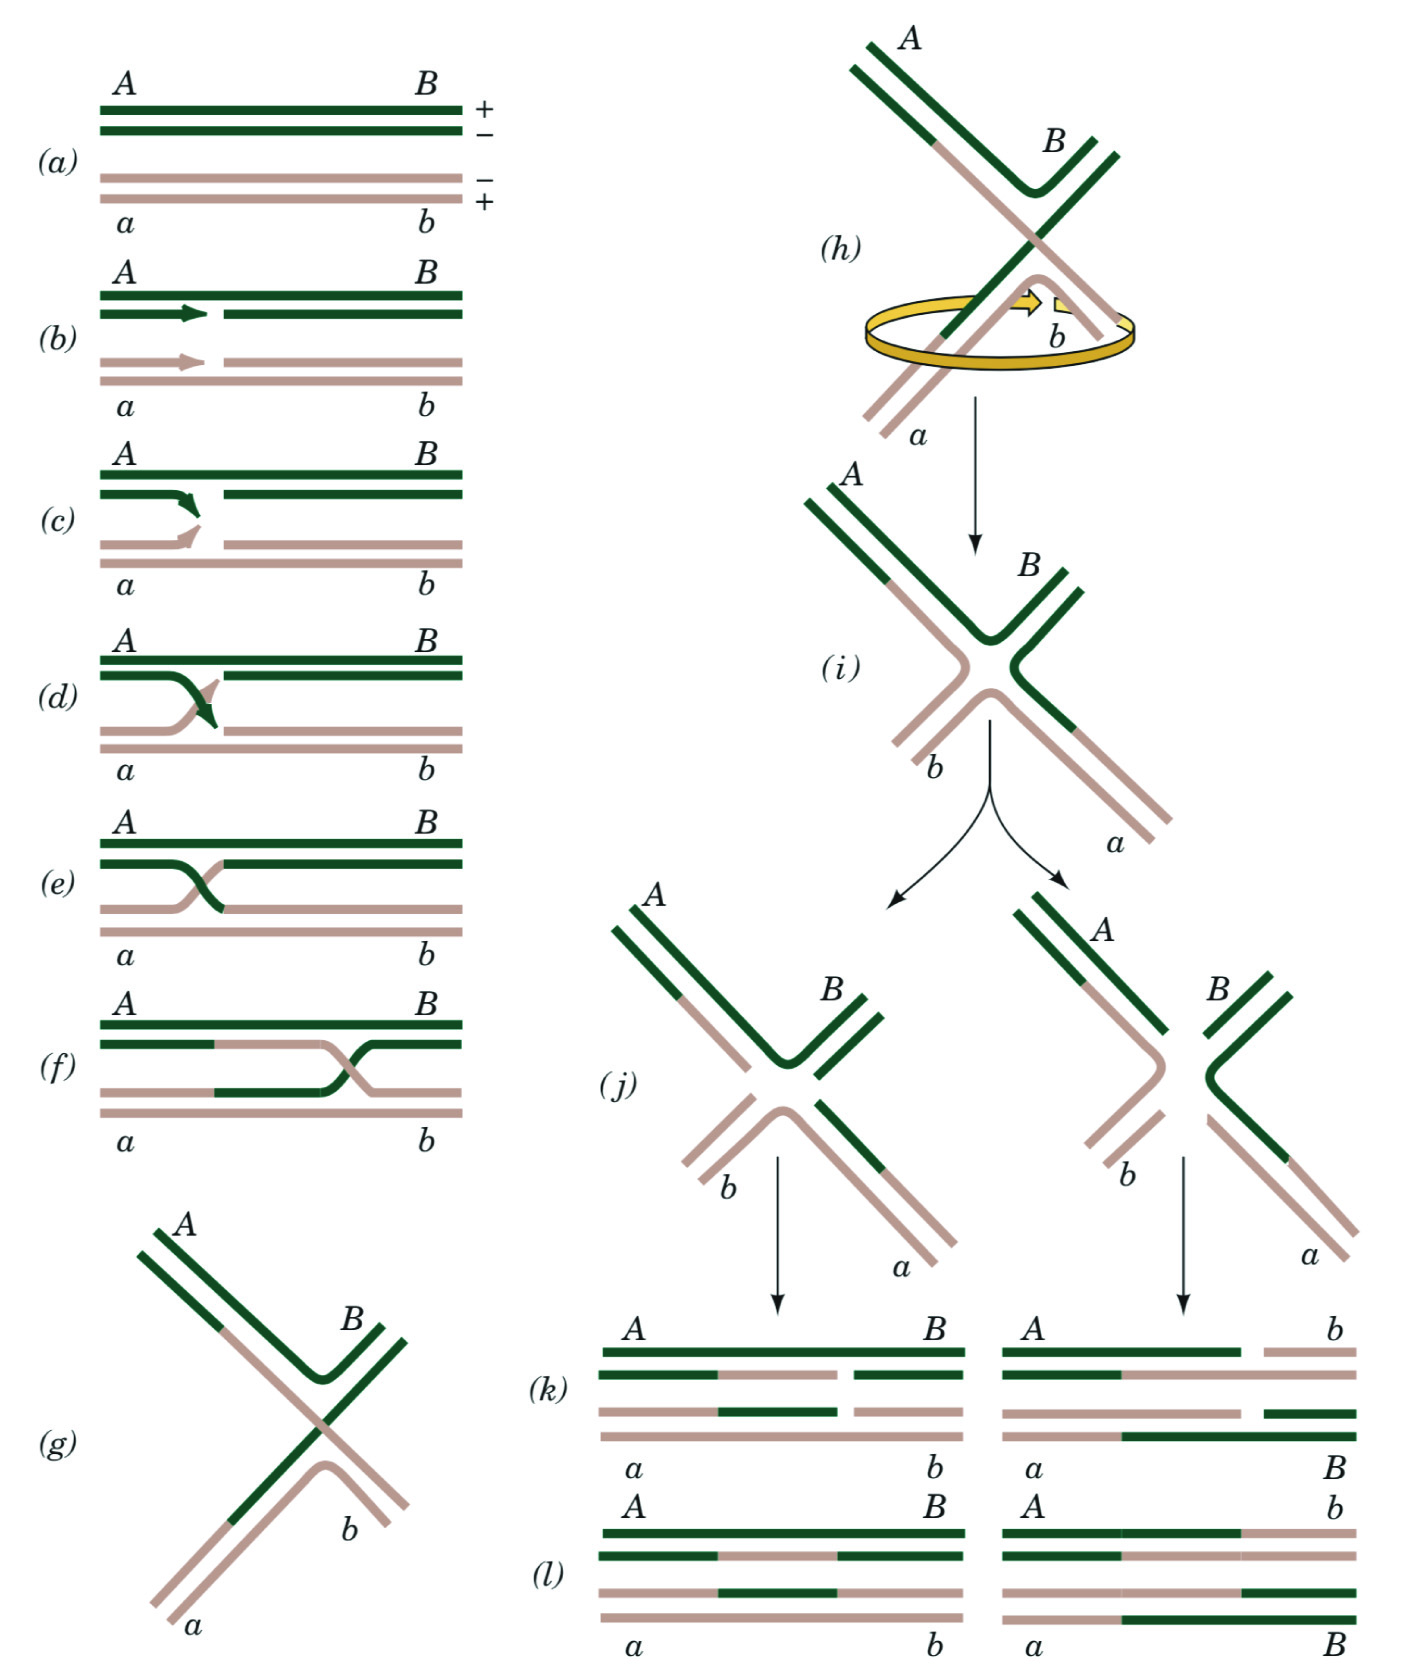
Figure 1. Conventional Holliday Model of Homologous Recombination. Biochemistry textbooks use detailed two-dimensional diagrams to convey a complex three-dimensional structure. Here, Fig. 30-67 from Biochemistry 4th ed., by Voet and Voet (John Wiley & Sons) is reproduced with permission (15). (A-F) The stacked-X configuration of double-stranded DNA break repair (DSBR) via homologous recombination. (G-I) Remodeling the stacked-X model of the repaired heteroduplex to form the open cruciform structure. (J-L) Resolving the cruciform model of the heteroduplex to yield two independent DNA duplexes. No part of this material may be reproduced, stored in a retrieval system or transmitted in any form or by any means, electronic, mechanical, photocopying, recording, scanning, or otherwise, except as permitted under Sections 107 or 108 of the 1976 United States Copyright Act, without either the prior written permission of the Publisher or authorization through payment of the appropriate per-copy fee to the Copyright Clearance Center.
In three dimensions, the "top strand" and "bottom strand" are actually proximal to each other, as demonstrated by an x-ray crystal structure of a Holliday junction (Figure 2). This model enables students to visualize hydrolysis and ligation to form two new heteroduplexes, each comprised of pieces of three individual DNA strands. We hypothesized that the conceptual block for students was in connecting the "X" exchange in the line diagrams to the "open" cruciform structure that was observed in atomic-resolution structures of Holliday junctions. Indeed, to assist in this conceptualization, some textbooks show two-dimensional manipulations of the anti-parallel stacked-X configuration into an open cruciform structure (Figure 1, G-L). However, many of our students struggled to follow the 2D representations of a 3D manipulation. Therefore, we realized that the conceptual challenge for students was the conversion from the parallel-line diagram to the open-cruciform structure (e.g., the spatial conceptualization of the relationship between Figure 1F and Figure 1L.
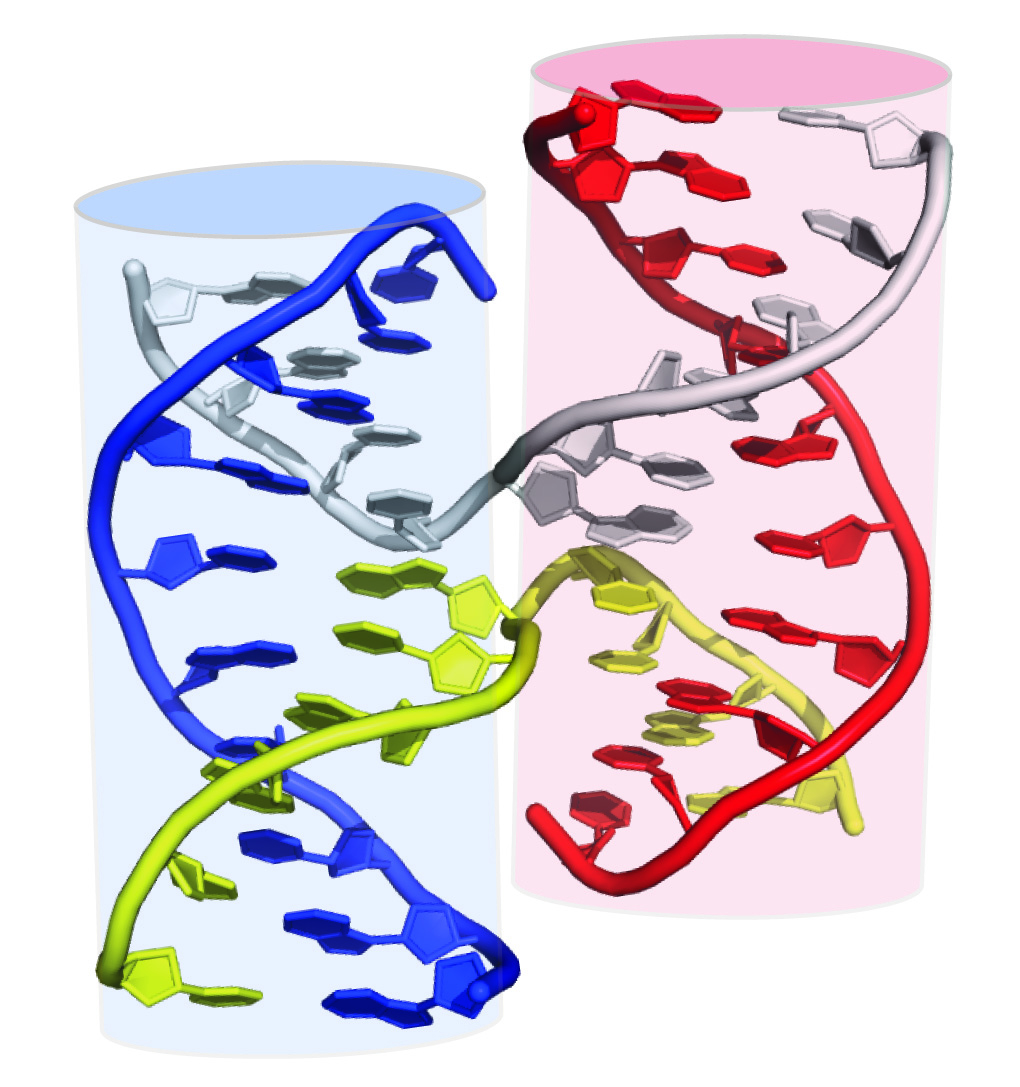
Figure 2. X-ray crystal structure of a Holliday junction. Cartoon representation of the heteroduplex crystal structure viewed along the 2-fold axis of symmetry. Two cylinders are superimposed on this model to emphasize the stacked helices in the Holliday junction, each of which is composed of three nucleic acid strands. PDB 1DCW; image created in PyMol (16) and Adobe Illustrator. Adapted from Fig. 30-68 of Voet and Voet (15).
Chenille stems (a.k.a. pipe cleaners) have been previously deployed to model DNA strands in lessons about genetic crossover during meiosis (12). We have built on this strategy, first by building a more detailed physical model, and then by incorporating the model manipulation with both static images and online animation resources. The combination of these three elements assists students in visualizing the molecular details of Holliday junction structures. Our approach provides each student with a small, portable, dynamic model of a Holliday junction to translate between the conventional textbook diagrams and high-resolution structures, while simultaneously facilitating a detailed mechanistic understanding of how these complex DNA structures are manipulated by cellular machinery.
Intended Audience
This lesson is used in an upper-level molecular biology course at a large state university; the students are predominantly senior-year Biochemistry majors and minors. As an upper-level course, prerequisites include general chemistry, general biology, organic chemistry, and fundamental biochemistry; genetics is a co-requisite for this course at our institution, although we strongly advise students to take it before enrolling in molecular biology.
Required Learning Time
50 - 120 minutes (1-2 class periods, depending on the preferred depth and in-class practice).
Prerequisite Student Knowledge
Students should have a general understanding of the central dogma of molecular biology, general chemistry, and organic chemical reactions. Students will also benefit if they also have a general conceptualization of genetic crossover at the cellular level, as this exercise will be illuminating how genetic crossover (or non-crossover) occurs at the molecular level. In particular, students should be familiar with the general mechanism of DNA polymerase.
Prerequisite Teacher Knowledge
Instructors who are familiar with fundamental molecular biology and biochemistry will have the expertise needed for this lesson. Additional expertise in structural biology and spatial reasoning would be helpful when assisting students as they manipulate and form their own mental models of the DNA structures (11,13,14).
SCIENTIFIC TEACHING THEMES
Active Learning
Following step-by-step with the instructor's demonstration, students will build the tactile manipulative from component parts, first making duplex DNA structures before building the Holliday junction heteroduplex structure. They will then work in small groups to complete an in-class problem set, followed by large-group discussion as a whole class. Optional activities include a take-home problem set after the classroom discussion for students to implement the conclusions/discoveries made during the previous activities.
Assessment
To directly measure learning, instructors may choose to use a pre/post assessment on "genetic crossover", which will evaluate the student's understanding of genetic crossover at the cellular and molecular levels. Students may also turn in their small-group problem set that was completed in class, for either formative or summative assessment; the optional clicker question "quiz" following the in-class discussion can be used as material for formative/just-in-time teaching, or as a summative post-activity assessment. Finally, student performance on a summative short-answer exam question can be monitored over multiple semesters.
Students will monitor their own learning through the small-group discussions while completing the in-class problem set, as well as their comprehension of the material during the large-group problem set. A take-home problem set, along with recommended problems from the textbook being used in the course, also provides additional opportunities to practice the skills developed in class.
Inclusive Teaching
This lesson is explicitly designed to augment the static images from the required textbook. The activity utilizes all five forms of representations as described by Gilbert (1): concrete, verbal, symbolic, visual, and gestures: (1) The three-dimensional manipulative model of the Holliday junction is concrete; (2) multiple opportunities are provided for students to describe what the model and what is happening at every step of Holliday junction resolution; (3) symbolic molecular representations are interpreted when students compare the manipulative to crystal structure models of DNA; (4) multiple visual representations, including crystal structure images, schematics, and the three-dimensional manipulative, provide a variety of visual approaches to the same system; (5) students use a variety of gestures to physically manipulate the three-dimensional model to create the different structures that exist in the Holliday junction.
This activity will leverage diversity within the classroom by encouraging every student to provide their perspective on how the molecules are structured and how they are changing. In particular, the color-coded chenille stems that are described here are highly adaptable for differently-abled students, including varying color combinations for dichromats and trichromats, or using differently-textured stems for visually-impaired students. These activities have been successfully integrated with professional online animations that are expertly narrated, and multiple problem sets allow study and practice at multiple learning paces.
LESSON PLAN
The class session takes place in a standard lecture room that can seat a class of 100 students. The room is equipped with tabletops and chairs that swivel to allow easy discussion with students around and behind them. A document camera and projector allow for easy modeling of the structures and demonstrating the construction of Holliday junction with the chenille sticks.
The overall lesson timeline can be found in Table 1.
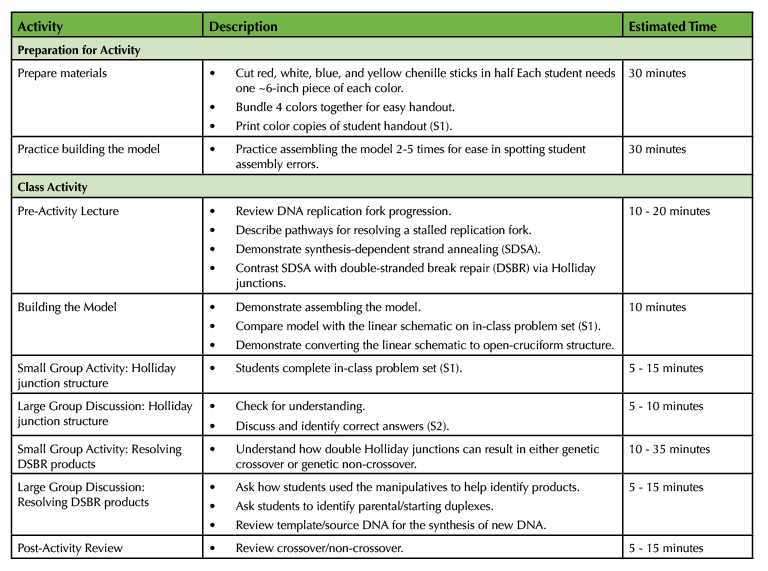
Table 1. Holliday Junction Activity – Teaching Timeline.
Pre-Class Preparation
Procure chenille stems (a.k.a. "pipe cleaners", approximately 12-14 inches long) in four different colors (e.g., red, blue, yellow, white). Using scissors or wire snips, cut the stems in half, producing short pieces that are ~6 - 8 in long. Collect one of each color into a set of four, and loosely twist so that it is easy to distribute to each student in the class.
Prepare color copies of the in-class problem set for distribution (Supporting File S1. Holliday Junction – In-Class Problem Set).
In practice, we have found that it is useful for the instructor to practice building the manipulative 2-5 times before class, as well as guide any Learning Assistants/Teaching Assistants through the activity so that they are prepared to assist students.
Class Activity
Pre-Activity Lecture
Introduce the lesson by reviewing DNA replication fork progression and describe the general pathways for resolving a stalled replication fork. After introducing the general concept of homologous recombination, including strand invasion, show a narrated online video ("Animation 13: Homology-dependent double-strand break repair", https://www.youtube.com/watch?v=86JCMM5kb2A, produced by Oxford University Press) to demonstrate synthesis-dependent strand annealing (SDSA), occasionally pause the video to discuss elements of the video and connect those concepts to the images from the students' required textbook. At the beginning of the video, explicitly note that all of these processes are regulated by protein complexes, but most of those proteins are not shown. The focus of this lesson is the changes in the DNA, and the next lesson will focus on the proteins that carry out these processes.
Discussion questions posed to the class during the online video:
- Why do you think 3' single-stranded (ss) tails are produced? (possible answers: because DNA synthesis happens 5' ➝ 3'/needs a free 3' end for polymerase/3' ss tail acts as primer)
- Where does the homologous double-stranded (ds) DNA come from? (possible answers: sister chromatid during mitosis, another region of the chromosome with same/very similar sequence)
- What sequence is now present at the site of the original break? (comprehension goal: it is copied from the intact homologous sequence, not the original sequence that was broken)
Contrast SDSA with double-stranded break repair (DSBR) via Holliday junctions, in which there is not dissociation and re-annealing of the newly-synthesized strand. Using the static images modified from the textbook (the conventional "line schematics") (Figure 1), identify the invading strands, newly-synthesized DNA, and set up the problem of homoduplex and heteroduplex DNA that needs to be resolved in order for the DNA to be separated into two double-stranded helices. Explicitly note the difference between the textbook schematics and the "real world" structure of the Holliday junction, as determined by x-ray crystallography (Figure 2). This sets up the visualization challenge to the students: how do we interconvert these two depictions of the same DNA complex?
Building the Model
Distribute the sets of chenille stems (one per student) as well as the in-class problem set (S1. Holliday Junction – In-Class Problem Set).
The steps to build the chenille-stem manipulative are as follows:
- Using the document camera at the instructor podium, demonstrate how to twist the red and white stems together to make a right-handed helix (Figure 3A). Lead a brief discussion and review why it is important that the helix be right-handed (because B-form DNA is a right-handed helix!). Task students with making a red/white helix and a blue/yellow helix, checking with the others in their small group to make sure they were producing right-handed helices. Circulate in the room to assist.
- Once all students have their right-handed helices, return to the document camera and walk the students through the creation of a Holliday junction using these two dsDNA models. Unwind half of each helix, so that each molecule is half-duplex and half-single-stranded (i.e., each molecule looks like a "Y") (Figure 3B).
- Superimpose the molecules so that the ss blue is on top of the ss white, and the ss yellow is on top of the ss red (Figure 3C, left panel).
- Twist the ss blue and white together into a right-handed helix (Figure 3C, middle panel).
- Then, twist the ss yellow and ss red together to make a right-handed helix (Figure 3C, right panel).
- At the exchange point (which should look like a smushed "X"), loosen the twist on each of the duplex arms about a half-twist. This should allow the molecules to adopt the same structure as the stacked-X/linear schematic. (Figure 3D).
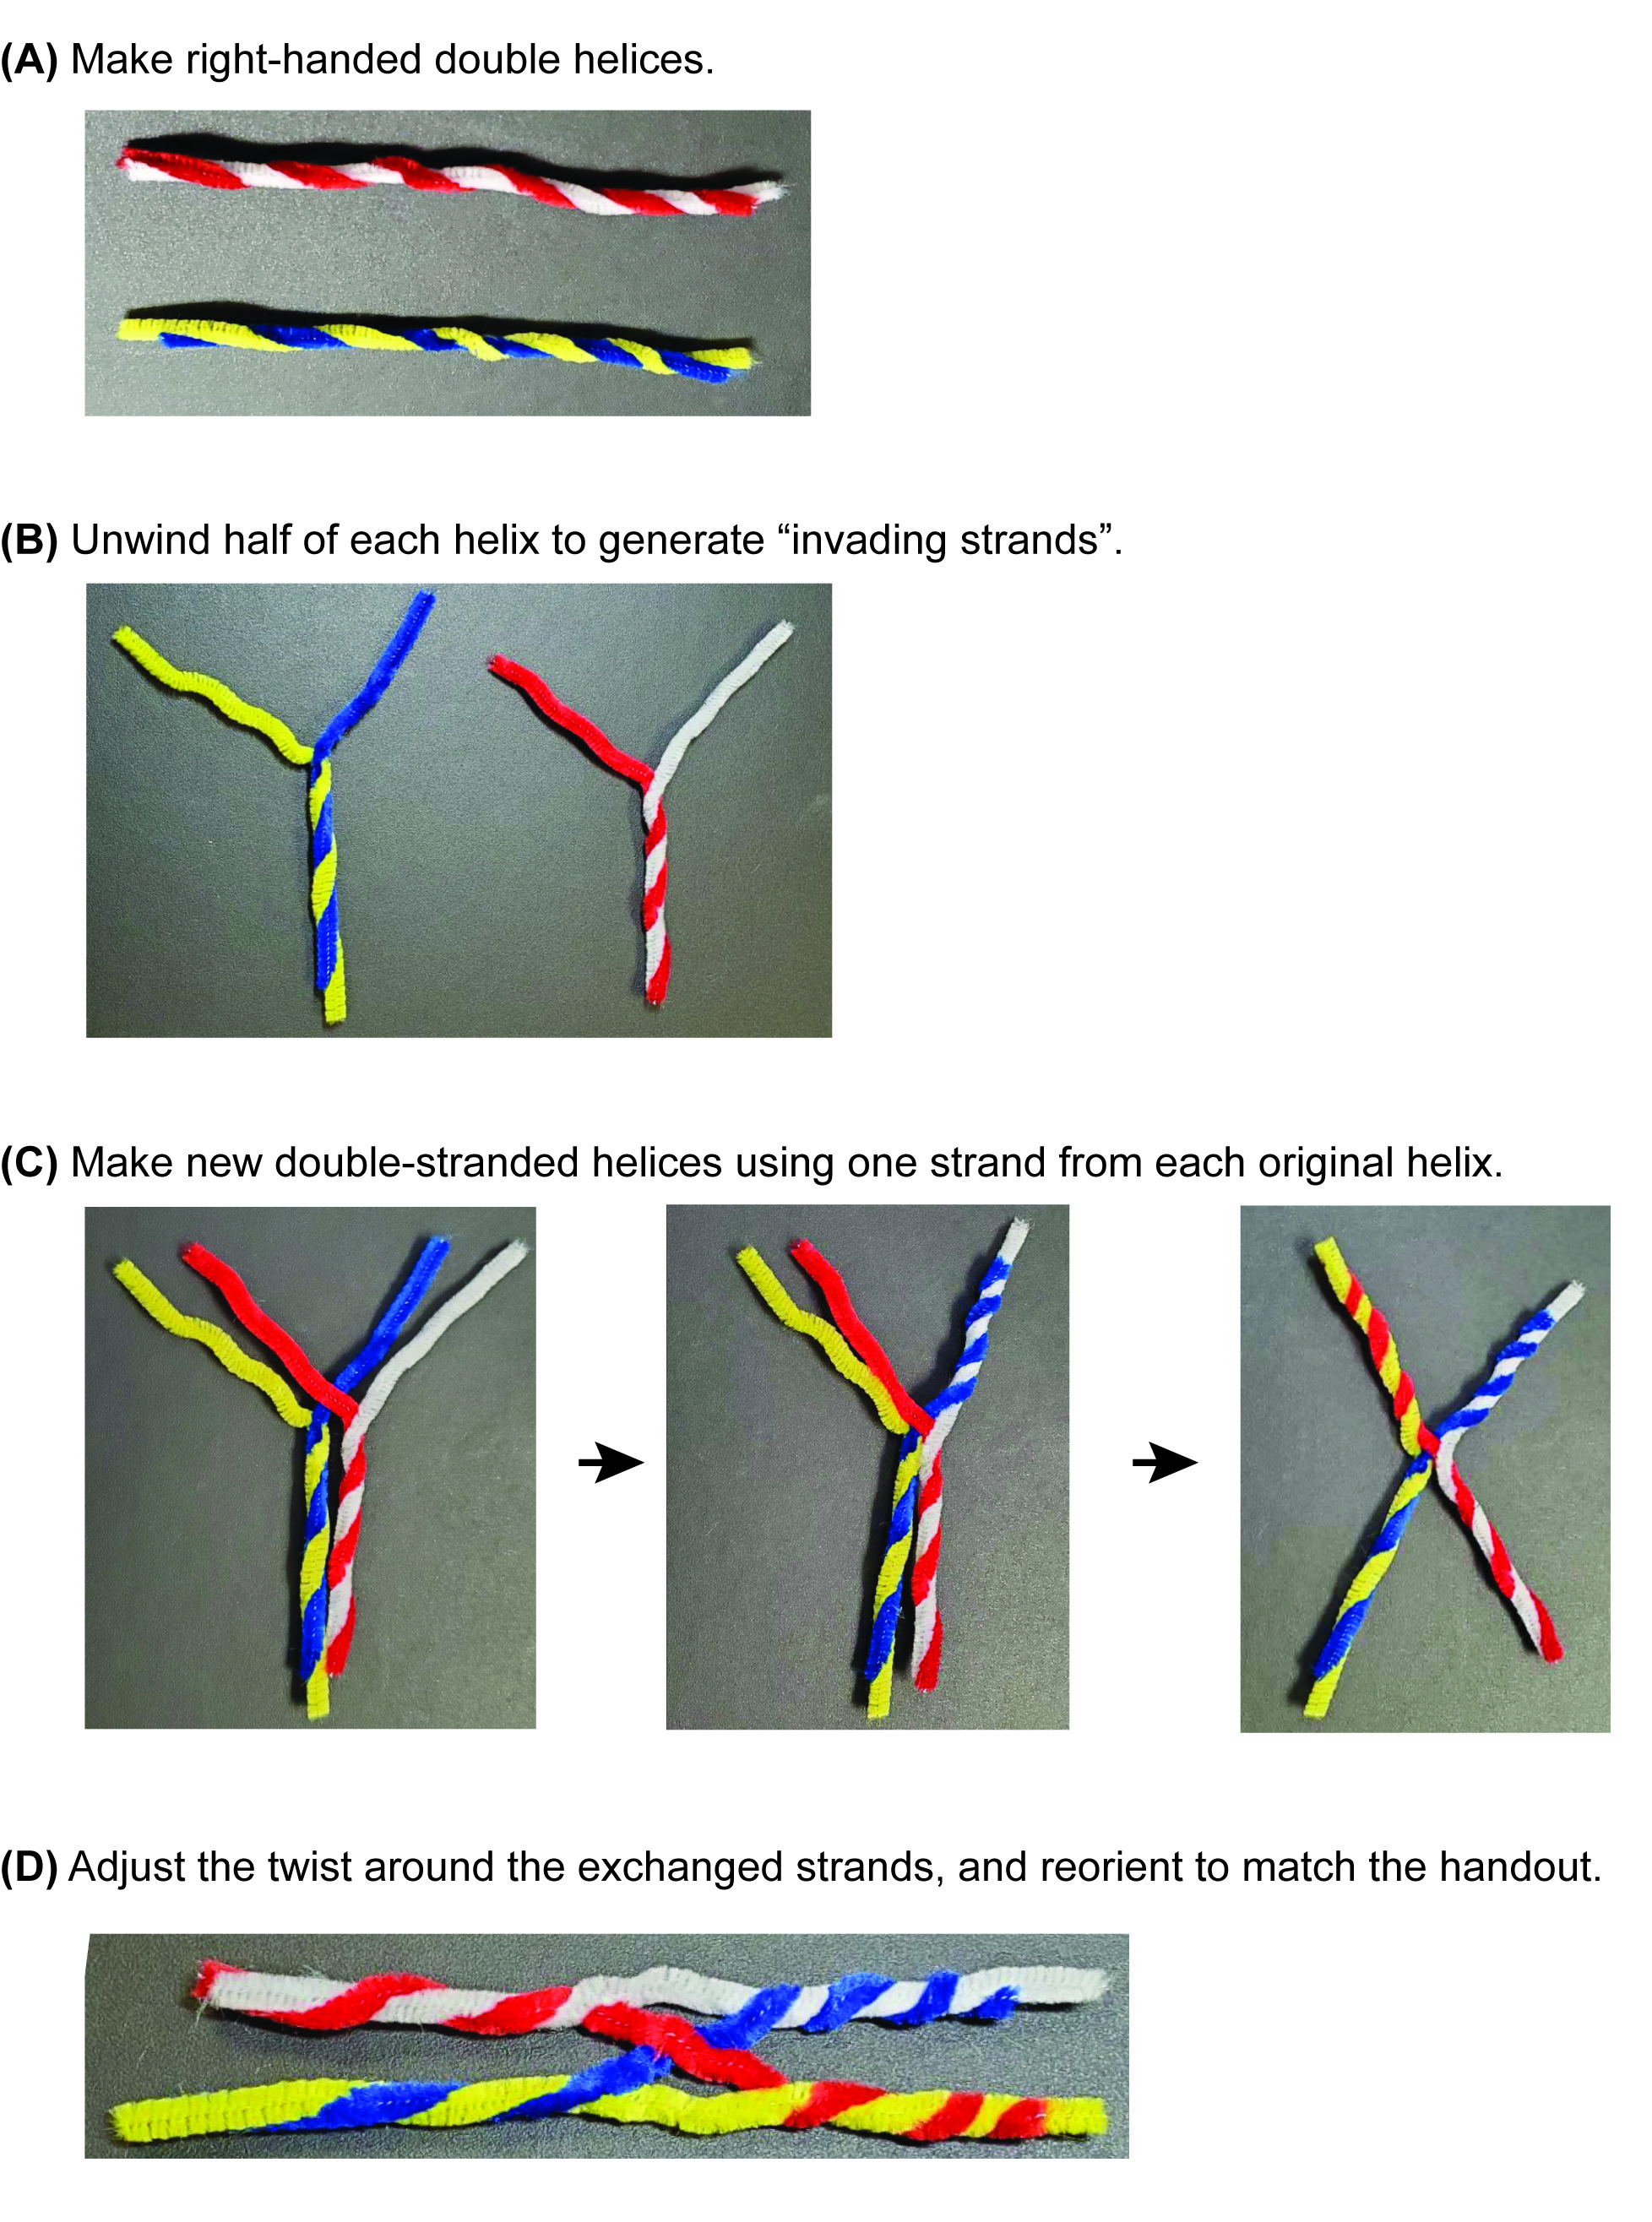
Figure 3. Construction of the Holliday junction manipulative. A stepwise guide to building the manipulative, starting with (A) creating two double-stranded DNA models. These are unwound to (B) form two half-ds, half-ss structures. (C) The single-stranded regions are then exchanged between the original helices to form heteroduplex structures. (D) After adjusting the twist and writhe of the duplexes adjacent to the strand-exchange site, the manipulative can be oriented to match the stacked-X schematic in the In-Class Problem Set (Supporting File S1: In-Class Problem Set).
At this point, invite students to compare their model with the schematic at the top of the in-class problem set, as well as similar figures from the course-required textbook.
Manipulating the Model
On the document camera, demonstrate how to convert the linear schematic model into the open-cruciform structure that was observed by x-ray crystallography. This is accomplished by twisting the model perpendicular to its long axis (Figure 4A).
The resulting model should now have an open-cruciform structure (Figure 4B).
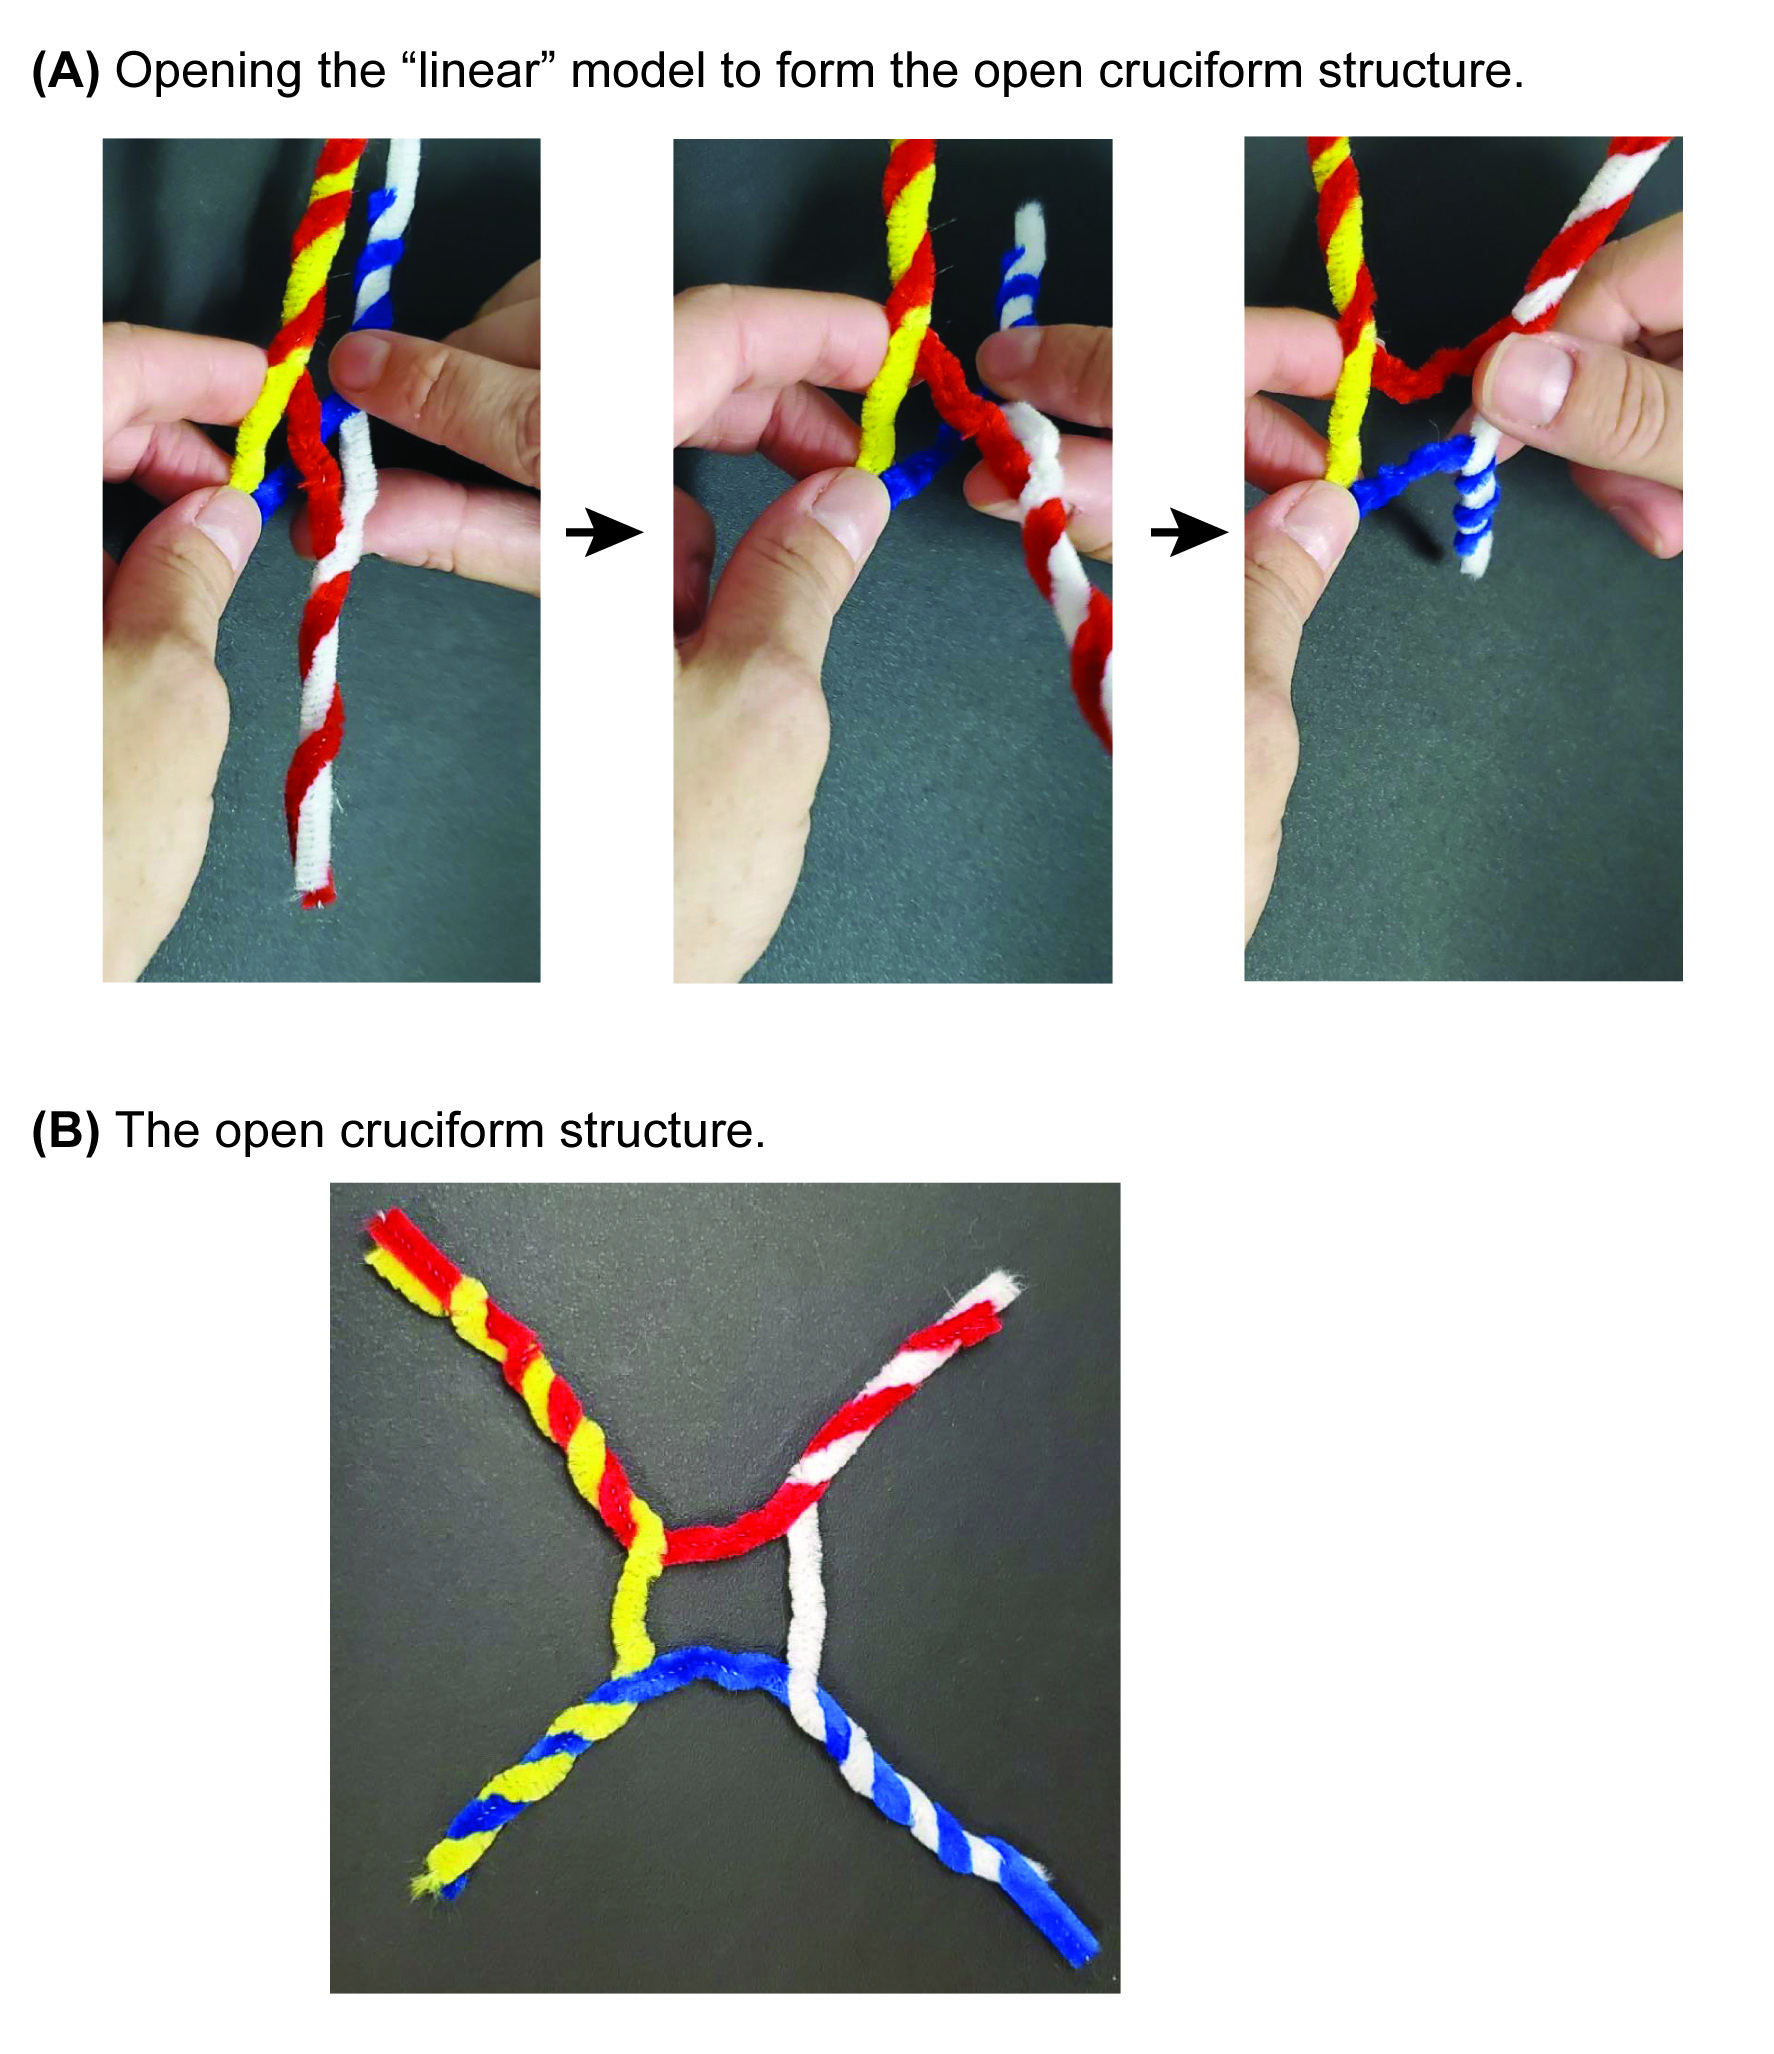
Figure 4. Converting the manipulative from the stacked-X form to the open-cruciform structure. (A) Holding the model in both hands, the user twists the model along its long axis to open the “X” formed by the exchanged strands. This will convert the manipulative from the stacked-X schematic configuration into the (B) open-cruciform structure that was observed by x-ray crystallography.
This is now used as the starting point for a discussion about how the Holliday junction is resolved, by the resolvase enzymes cutting on either axis (the "X" cut site or the "Y" cut site), and then the strands re-ligated to produce two independent DNA duplexes. It can be helpful to use a permanent marker or small piece of masking tape to identify the 5' ends of each DNA strand. This assists students in identifying which cleaved ends can be ligated together, and which ones cannot.
Small Group Activity: Holliday junction structure
Students then work in small groups for ~ 5 - 8 min to use their model to help them interconvert between the stacked-X and cruciform structures to determine the products of resolving the Holliday junction at either X and Y sites (Supporting File S1. Holliday Junction – In-Class Problem Set). Circulate in the room to assist individual groups.
Large Group Discussion: Holliday junction structure
The small groups are then brought back into a large discussion, to check for understanding and to identify the correct answers (instructors can reference Supporting File S2. Holliday Junction – In-class Problem Set Key). Encourage students to share their experiences with the model and to identify what challenges they encountered while working on the posed problem.
Small Group Activity & Discussion: Resolving DSBR products
The next task for students is to understand how double Holliday junctions can result in either genetic crossover or genetic non-crossover. This is accomplished by students again working in small groups for ~ 20 - 45 min (depending on depth and available time). In this session, the students will analyze a double-Holliday junction locus, such as that created by DSBR (Supporting File S1. Holliday Junction – In-class Problem Set). We have found that the "lightbulb moment" for most students is recognizing that each Holliday junction can be resolved independently (i.e., either X or Y cut), and that the particular combination of X and Y cuts cause either crossover or non-crossover of the sequence flanking the double Holliday junction site. Encourage students to use the manipulatives to identify the resulting sequence when each individual Holliday junction is resolved by a particular cut. Then, students combine those results and compare the flanking sequence to determine crossover or non-crossover, relative to the "original" duplexes (i.e., yellow/blue and red/white). Working in pairs or small groups is especially helpful for this part of the activity, as one student's manipulative can be the "left" Holliday junction while another student's manipulative can be used as the "right" Holliday junction.
As the students are solving each combination of cuts, they can identify the resulting dsDNA molecules either through words (the genotype combination) or by drawing the colors of the duplexes (using colored pencils/markers). Separating out each step of the process (e.g., which cut site at each Holliday junction, the resulting genotype of the repair, and then identifying genetic crossover/non-crossover) helps students sort out the difference between sequence within the repair site and the potential reassortment of sequence that flanks the repair site.
Large Group Discussion: Resolving DSBR products
After most of the small groups have completed at least half of this activity, bring students back into large-group discussion. Inquire how many students used the manipulative to help them identify the products of Holliday junction resolution. Then, lead the class through answering Question 1 ("What will the 'sequence' be of the repaired strands?") using guiding questions. For example, the students are asked what the parental/starting duplexes were (the correct answer being one blue/white duplex and one red/yellow duplex; Supporting File S2. Holliday Junction – In-class Problem Set Key). Another helpful question to orient the whole class is to ask on which duplex the DSB originally occurred; the students should be able to identify that it was the blue/white duplex, because those are the 'broken' strands that have 3' ss overhangs and which have invaded the intact/unbroken blue strands. This is also an opportunity to review the template/source DNA for the synthesis of new DNA to repair the broken strand, as the DNA polymerase will copy the yellow sequence onto the blue strand for repair (as was demonstrated in the online narrated video).
Ask a small group to volunteer to walk the class through how they answered Question 2A in Supporting File S1. Holliday Junction – In-class Problem Set, which resolves the double Holliday junction with an X cut on the left and a Y cut on the right. As the students describe their approach, carry out the work on the document camera, using both color drawings and the Holliday junction manipulative. The "Holliday Junction Practice" document can be used, which has four double Holliday junctions that can be drawn on and colored to match the proposed resolution and/or manipulative colors (Supporting File S3. Holliday Junction – Resolution Practice). With white-out tape, "cut" the appropriate strands of the DNA; in the example shown here, the left Holliday junction was cut at the "x" sites and the right Holliday junction was cut at the "y" sites. We then labeled the new ends with 5' and 3', and then used highlighters to color-code the new ends that are ligated together during resolution (Figure 5A).
Directly compare the original, unbroken duplexes to the redrawn, resolved duplexes to analyze whether genetic crossover had occurred (Figure 5B). Label both the original and the repaired duplexes with the genotype of each locus, relying on the color combinations of strands at both loci. In the example shown here, the resolution of the double Holliday junction with an x/y set of cuts results in the blue/yellow duplex of the twins genotype re-sorting with the red/green duplex of the diamondbacks genotype - a clear demonstration of crossover.
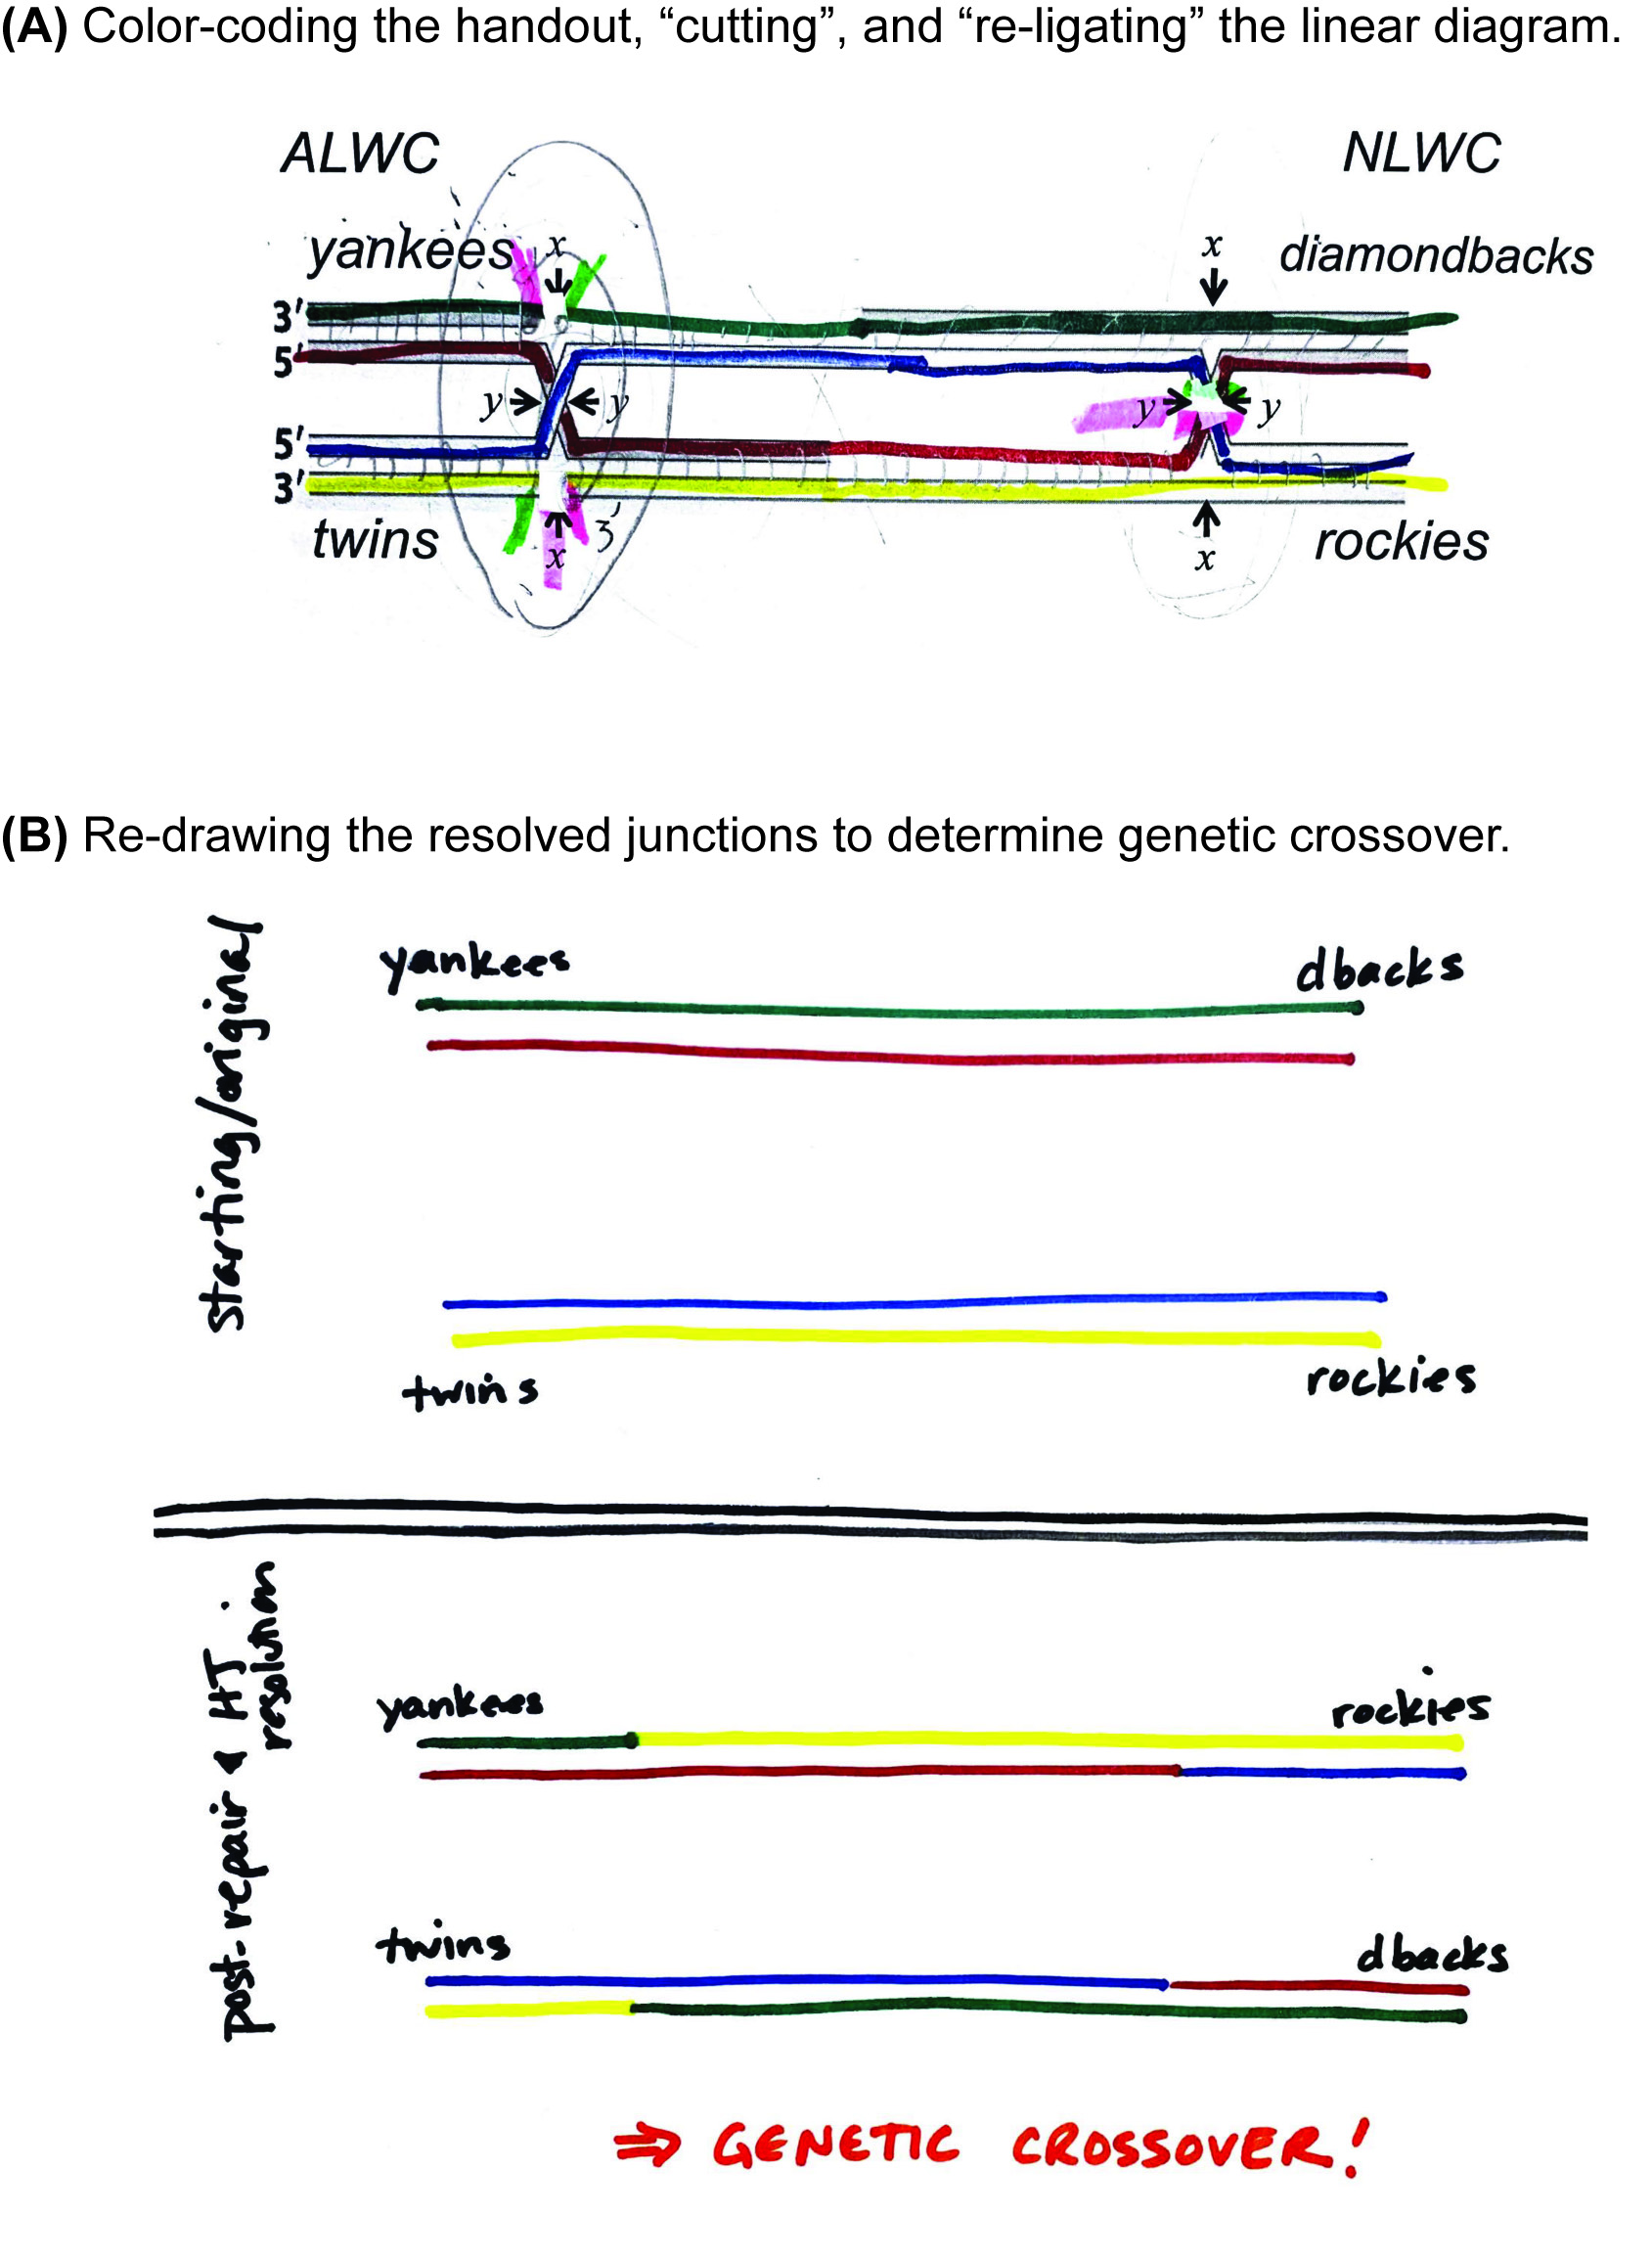
Figure 5. Instructor-led resolution of a double Holliday junction. Using the Supporting File S3: Holliday Junctions Practice document and a document projection camera, the instructor guides a large-group discussion about how to determine the genetic outcome of resolving a double-Holliday junction intermediate resulting from DSBR. (A) The result of in-class, real-time resolution of a Holliday junction using markers, highlighters, and white-out tape. The gene loci that flank the site of damage/repair were colored with markers, and students voted to cut the left and right junctions at the x and y sites, respectively. The instructor “cut” that DNA with whiteout tape, and then the class discussed which new 5’ ends would ligate to which new 3’ ends; the pairs to be ligated were marked with colored highlighters. (B) The repaired strands were redrawn using the same color-coding of the DNA strands to clearly show the independent, resolved duplexes. When annotated with the alleles at each locus, this depiction allows for ready discernment of genetic crossover/non-crossover.
Post-Activity Review
If time allows in the class period, it may be helpful to review crossover/non-crossover using a narrated online video ("Animation 14: Holliday junction resolution", https://www.youtube.com/watch?v=MvnWxN81Qps, Oxford University Press). However, this is also suitable to post to a learning management system (LMS) as an additional reference for students to use during completion of homework/take-home problem sets.
TEACHING DISCUSSION
Effectiveness of Lesson
We video-recorded the lesson for our evaluation of the effectiveness of the activity and to determine if additional changes were needed. Throughout the lesson, students were visibly engaged and communicating with the people around them. The initial reaction of the students who had taken genetics upon hearing that the lesson would cover Holliday junctions was frustration and concern for how difficult the concept was. Once students were building their models and working through the problem set, student comments shifted over to how much easier it was to see where the cleavage and ligation was occurring. During office hours, we noted that students had more directed questions regarding junctions as opposed to past student interactions asking for the content to be retaught. More frequent use of correct terminology both in class and during office hours was observed by the instructors. In addition, in a student evaluation at the end of the semester, a student in the class wrote, “The hands-on demonstration with pipe cleaners really helped visual (sic) concepts.”
Possible Modifications/Extensions
This activity is easily and readily adaptable for different sizes of class, classroom layouts, and student backgrounds/abilities. The affordability of the chenille stem manipulative (about 0.06 USD/model) allows each student to have their own model to use for studying (and even on future quizzes/tests, if the instructor permits). Subsequent problem sets (either in-class or take-home) can incorporate different questions about Holliday junction resolution to provide students additional opportunities to use their chenille stem manipulative to simulate Holliday junctions. Some students took the model and, as part of their personal study routine, adapted it using modeling clay of different colors to enable repeated cleavage and ligation of the Holliday junction. Because students are involved in this activity from the very beginning (making double stranded DNA models), they are highly engaged from the start.
For the large class discussion, each instructor can adapt the identity of the gene loci and alleles to suit their own proclivities. It is not necessary to keep the baseball theme used in the supporting file examples, but it may be appropriate when this module is taught in mid- to late October.
During the post-activity review, the instructor may wish to carry out either formal or informal assessments of student comprehension of Holliday junction representations, resolution, and/or identification of genetic crossover. This may include the use of clicker questions or have students re-take a pre-activity assessment to assess knowledge gains. In our experience, if time allows, we often begin work on the take-home problem set in small groups (Supporting File S4. Holliday Junction – Take-Home Problem Set). These problems challenge the students to extend their understanding of resolution to explicit DSBR, and the answers can be discussed in the subsequent class period (Supporting File S5. Holliday Junction – Take-Home Problem Set Key).
Formal assessment of student comprehension is carried out using an exam question that uses the skills practiced in both the in-class problem set and the take-home problem set (Supporting File S6. Holliday Junction – Exam Question and Key).
SUPPORTING MATERIALS
- Supporting File S1. Holliday Junction – In-Class Problem Set
- Supporting File S2. Holliday Junction – In-Class Problem Set Key
- Supporting File S3. Holliday Junction – Resolution Practice
- Supporting File S4. Holliday Junction – Take-Home Problem Set
- Supporting File S5. Holliday Junction – Take-Home Problem Set Key
- Supporting File S6. Holliday Junction – Exam Question and Answer Key
ACKNOWLEDGMENTS
We thank Nancy W. Lewis for assistance with the initial development of the pipe-cleaner model and the students in CHEM 4360: Molecular Biology at Texas State University during the 2014, 2015, 2016, 2017, and 2019 fall semesters for helping to develop and implement this lesson. Financial support for the manipulatives for these courses was provided by the Department of Chemistry and Biochemistry at Texas State University. This lesson benefited from helpful discussion with colleagues at the 2019 Transforming Education in the Molecular Life Sciences Symposium at the University of the Incarnate Word in San Antonio, TX. We greatly appreciate permission from Dr. Donald Voet, Dr. Judith G. Voet, and their publisher John Wiley & Sons to reproduce material from Biochemistry 4th edition.
References
- Gilbert JK. 2005. Visualization: A Metacognitive Skill in Science and Science Education, p. 9-27. In Visualization in Science Education. Dordrecht: Springer Netherlands.
- Jones LL, Kelly RM. 2015. Visualization: The Key to Understanding Chemistry Concepts, p. 121-140. In Sputnik to Smartphones: A Half-Century of Chemistry Education. Washington DC: American Chemical Society. doi: 10.1021/bk-2015-1208.ch008
- Wu H-K, Shah P. 2004. Exploring visuospatial thinking in chemistry learning. Sci. Educ. 88:465-492. doi: 10.1002/sce.10126
- Jittivadhna K, Ruenwongsa P, Panijpan B. 2010. Beyond textbook illustrations: Hand-held models of ordered DNA and protein structures as 3D supplements to enhance student learning of helical biopolymers. Biochem. Mol. Biol. Educ. 38:359-364. doi: 10.1002/bmb.20427
- Loertscher J, Villafañe SM, Lewis JE, Minderhout V. 2014. Probing and improving student's understanding of protein α-helix structure using targeted assessment and classroom interventions in collaboration with a faculty community of practice. Biochem. Mol. Biol. Educ. 42:213-223. doi: 10.1002/bmb.20787
- Schonborn KJ, Anderson TR. 2009. A model of factors determining students' ability to interpret external representations in biochemistry. Int. J. Sci. Educ. 31:193-232. doi: 10.1080/09500690701670535
- O'Connor CM, Collins K. 2006. A novel RNA binding domain in tetrahymena telomerase p65 initiates hierarchical assembly of telomerase holoenzyme. Mol. Cell Biol. 26:2029-36. doi: 10.1128/MCB.26.6.2029-2036.2006
- Davenport J, Pique M, Getzoff E, Huntoon J, Gardner A, Olson A. 2017. A Self-Assisting Protein Folding Model for Teaching Structural Molecular Biology. Structure 25:671-678. doi: 10.1016/j.str.2017.03.001
- Guzman K, Bartlett J. 2012. Using simple manipulatives to improve student comprehension of a complex biological process: Protein synthesis. Biochem. Mol. Biol. Educ. 40:320-327. doi: 10.1002/bmb.20638
- Chakraborty P, Zuckermann RN, Dill KA. 2013. Coarse-grained, foldable, physical model of the polypeptide chain. Natl Acad Sci 110:13368-13373. doi: 10.1073/pnas.1305741110
- Liu Y, West SC. 2004. Happy Hollidays: 40th Anniversary of the Holliday junction. Nat. Rev. Mol. Cell Biol. 5:937-944. doi: 10.1038/nrm1502
- Selvarajah G, Selvarajah S. 2016. Model building to facilitate understanding of holliday junction and heteroduplex formation, and holliday junction resolution. Biochem. Mol. Biol. Educ 44:381-390. doi: 10.1002/bmb.20964
- Alberts B, Johnson A, Lewis J, Raff M, Roberts K, Walter P. 2002. General Recombination. Molecular Biology of the Cell, 4th ed. New York, NY: Garland Science.
- Clancy S. 2008. Genetic Recombination. Nat. Educ. 1:40.
- Voet, D., Voet, J.G.. 2011. Biochemistry, 4th ed. Hoboken, NJ: John Wiley & Sons.
- The PyMOL Molecular Graphics System, Version 2.0 Schrödinger, LLC.
Article Files
Login to access supporting documents
Integrating Manipulatives and Animations to Visualize Holliday Junctions(PDF | 2 MB)
S1. Holliday Junction - In-Class Problem Set.pdf(PDF | 539 KB)
S2. Holliday Junction - In-Class Problem Set Key.pdf(PDF | 538 KB)
S3. Holliday Junction - Resolution Practice.pptx(PPTX | 124 KB)
S4. Holliday Junction - Take-Home Problem Set.docx(DOCX | 237 KB)
S5. Holliday Junction - Take-Home Problem Set Key.docx(DOCX | 247 KB)
S6. Holliday Junction - Exam Question and Answer Key.docx(DOCX | 148 KB)
- License terms

Comments
Comments
There are no comments on this resource.