Video Making Tips for Laboratory Instructors
Editor: Rachel Horak
Published online:
Abstract
Demonstration videos are an excellent way to introduce students to new laboratory techniques, but many available videos are of low quality, too long, lack human diversity, and the main narrator is someone other than the instructor of the course. Videos may feature terminology and equipment different from what the students will use and the availability of the video is also not controlled by the lab instructor. Lab instructors can enhance the lab experience of students by making their own demonstrations videos. The current cell phone camera technology allows instructors to make custom videos. We watched many successful how-to style YouTube videos and distilled several techniques. We then applied these techniques to make more engaging videos for our students. Many of our videos have found success on YouTube. In this paper, we break down our video making techniques for demonstrating laboratory equipment and protocols. We hope the readers will find inspiration to make their own demonstration videos to aide their students.
Primary Image: Successful Instructional Videos for Biology Classes. Still image from a successful instructional video used to teach students how to focus a microscope.
Citation
Patrick JE, Zhu JZ. 2022. Video Making Tips for Laboratory Instructors. CourseSource 9. https://doi.org/10.24918/cs.2022.45Article Context
Course
Article Type
Course Level
Class Type
Class Size
Audience
Principles of How People Learn
Assessment Type
Introduction
One of the problems student face in a laboratory setting is unequal access to the instructor when techniques are demonstrated. Some students are more assertive and get as close as possible. Some students are uncomfortable in crowded situations. Some students have physical advantages to see better. Some students can take notes at the same pace as the instructor speaks, while others cannot keep up. In Figure 1 we show some of the angles available to students in a lecture and lab type of setting. There are only a few ideal locations to watch a demonstration and sometimes the best angle to view a demonstration changes as the demo proceeds. One remedy to this situation is to give students access to the best possible angle by making a video (1).
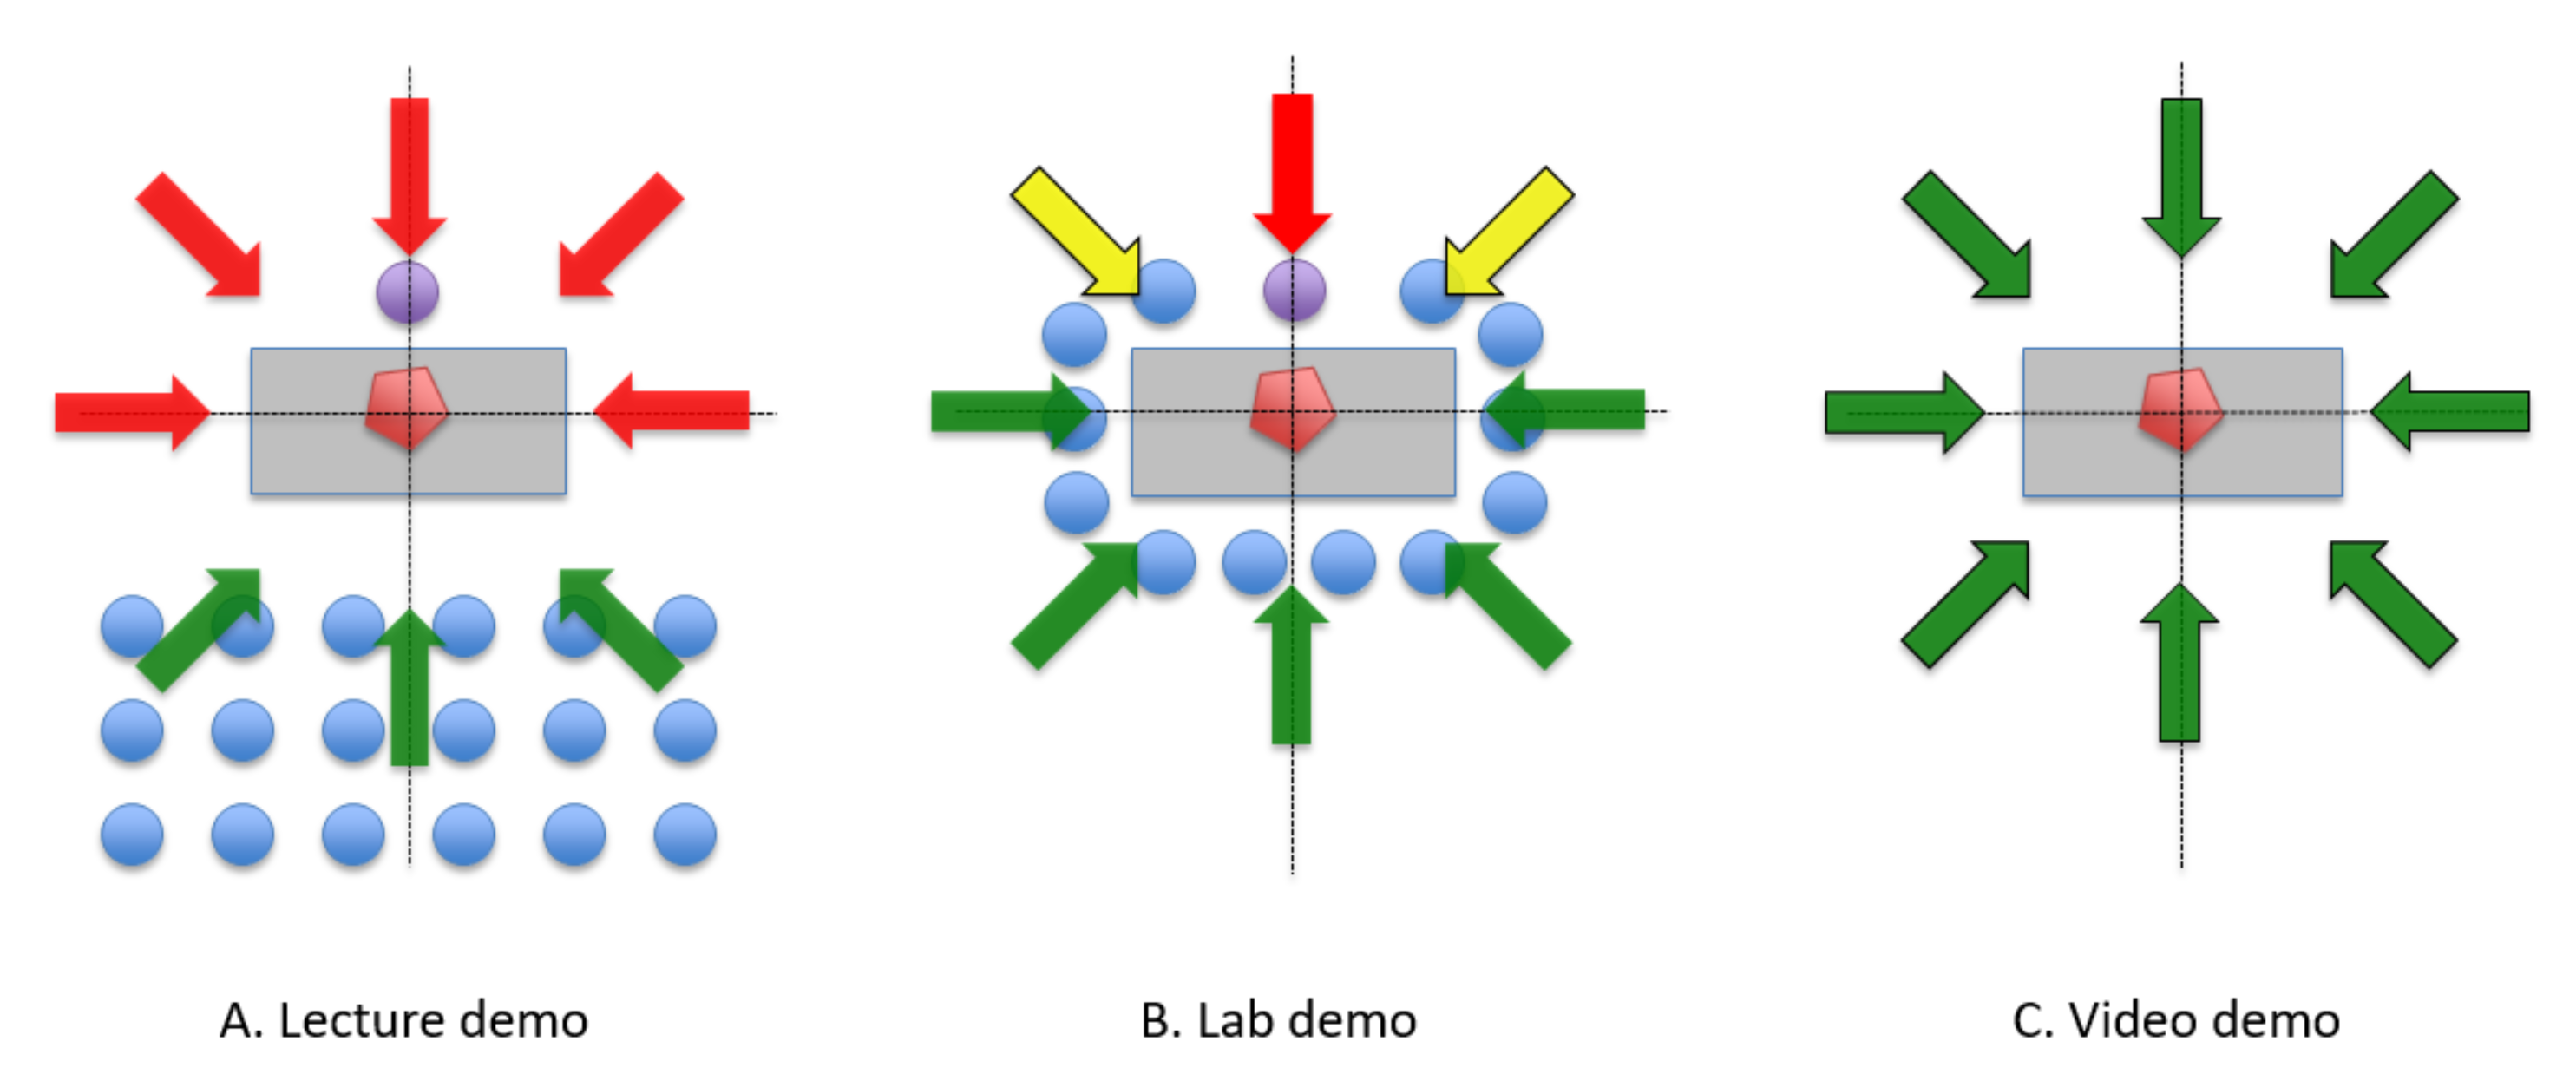
Watching a video can be a great way for students to become familiar with a technique or equipment before class (2). Videos are made more impactful if the demonstration video is made by the instructor, (3, 4) and if they include the exact same terminology and equipment as will be used in class. This will minimize the cognitive load for students so they do not have to translate information about one piece of equipment to an unfamiliar one (4). In addition, every student gets an optimal view of the demonstration and can re-watch the demonstration as many times as needed. Another advantage is that by making their own videos, instructors can foster inclusion and diversity by having former students or teaching assistants demonstrate the techniques, so that current students identify with the demonstrator and can imagine themselves doing the experiment. Finally, students have a readily-available resource to access in class even when the instructor is occupied with other students; instead of waiting and disengaging from the lab activity, students can use the video to troubleshoot on their own (5).
There are many instructional videos on YouTube available for instructors to use in class and to link to in their learning management system (LMS). But there are several problems associated with students attempting to use a linked video. First, the video resolution may be poor, giving students a poor viewing experience. Second, videos can be long and wordy, making it hard for students to find the specific support they need. Third, the equipment and terminology used in the linked video may differ from what students will use in lab. Fourth, videos available on YouTube may lack diversity in demonstrators, with demonstrators typically being older and Caucasian. Fifth, videos may not be accessible because the link has been removed or is broken. To overcome these problems we advocate instructors make their own high-resolution demonstration videos. In doing so, instructors can adopt the best viewing angle; highlight the exact equipment, techniques, and terminology students will use during lab and use former students as the narrators. Here we present some tips we have used to make an effective demonstration video in a short amount of time.
Hardware
When selecting equipment for use in making a video, consider image quality, lighting, and sound. A cell phone, tablet, DSLR, or camcorder capable of producing 720p or better video should be used to record the demonstration. A tripod is recommended for most shots because handheld recordings are often shaky. Lighting is critical to getting good shots. Generally, in a lab setting, the lighting is acceptable, but additional lighting may be needed if your videos are “grainy.” A microphone may be necessary if the room is particularly noisy. Instructors may want to inquire with Fine Art or IT departments at their institution to see if equipment is available to borrow or rent. For a full list of equipment we use to produce our videos see S1. Video Making – Equipment.
Learning Objectives
Keep the objective of the demonstration simple. As you design your video, consider the following questions: What do I want my students to learn? What is the most important aspect? What shots or angles would be best suited to achieve my goals? Make up a list of shots that you need and consider what the best viewing angle is. We recommend keeping videos specific to the protocol or equipment being demonstrated, and avoid references to assignment specific details. We have included a table that you could use to help you organize your shots (S2. Video Making – Shot Worksheet).
Concise Script
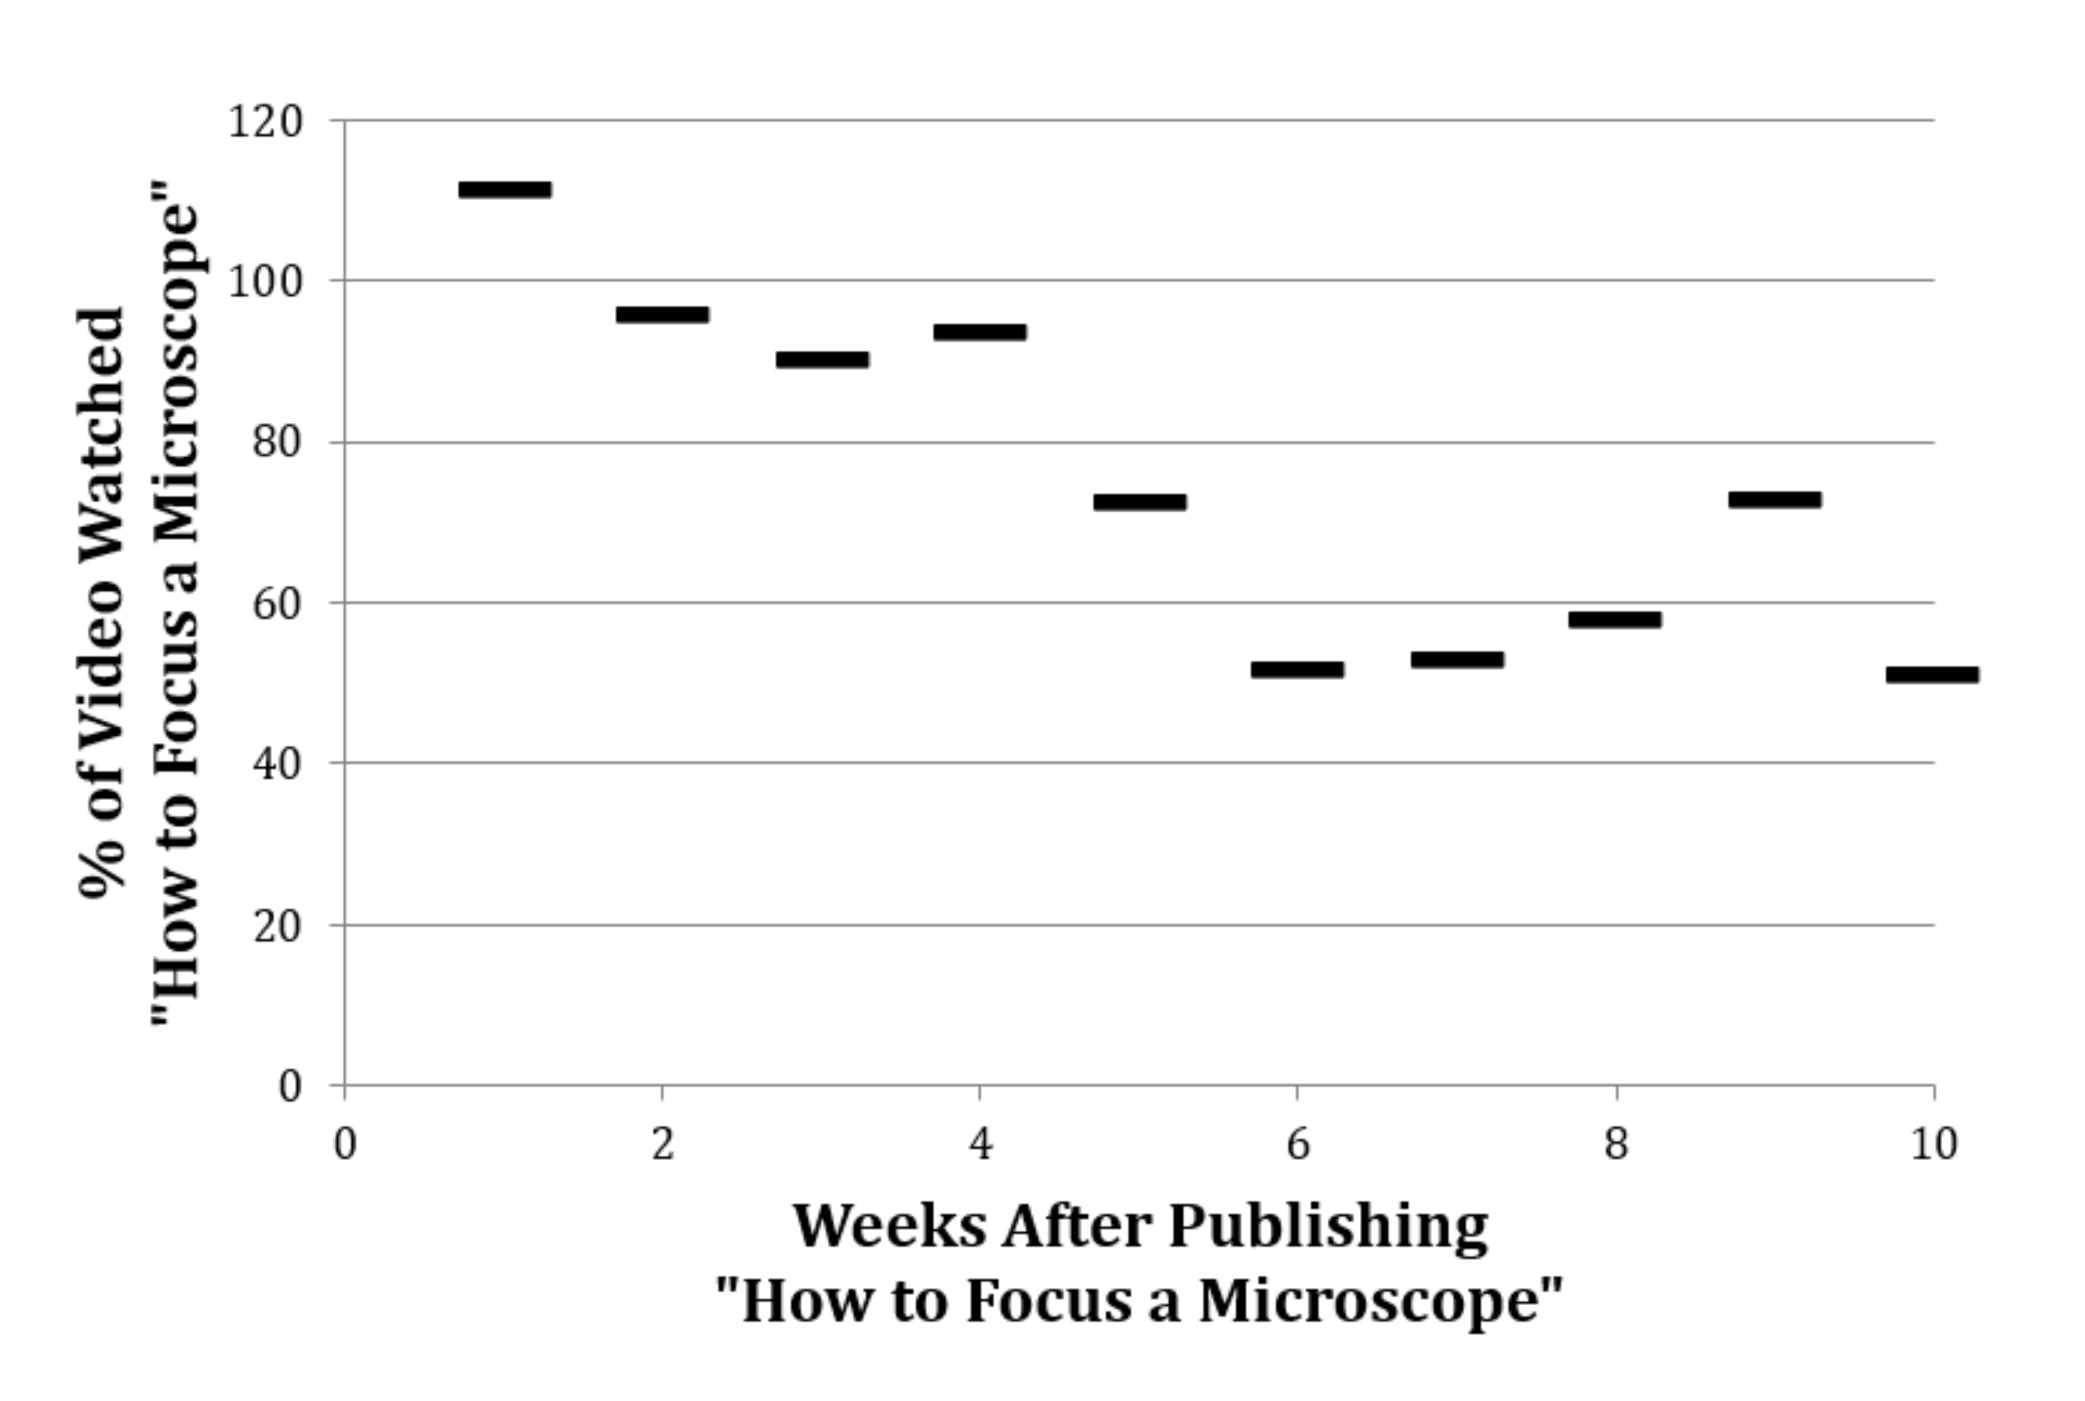
It is important to be concise. Avoid unnecessary details on a piece of equipment and focus on the technique being demonstrated. Opinions may distract from the video. Include relevant information on the technique. For example, “turn the nosepiece slowly and listen for the click” is relevant information for focusing a microscope. Lastly, there is no need to repeat yourself. The media of video allows students to replay any part they want. We found that students are watching some parts of our videos over when they are first released (Figure 2).
Framing and Angles
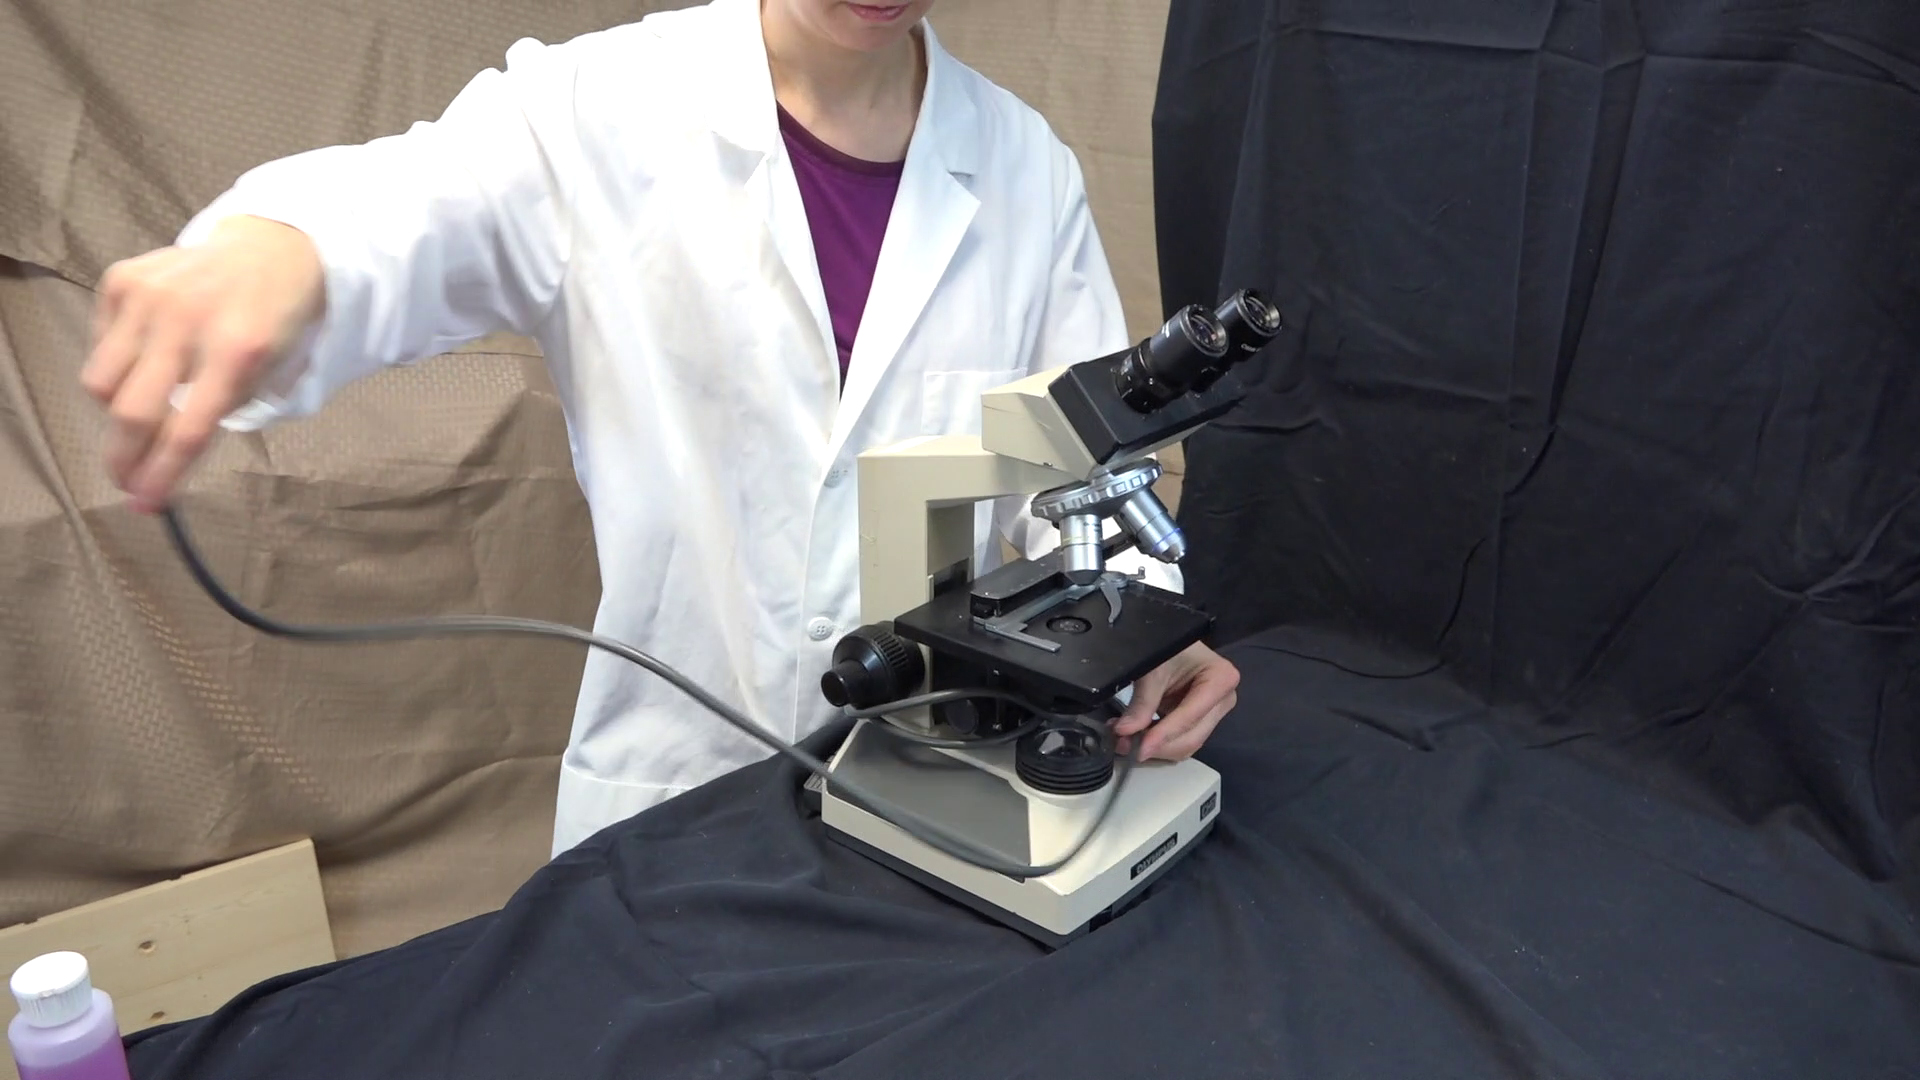
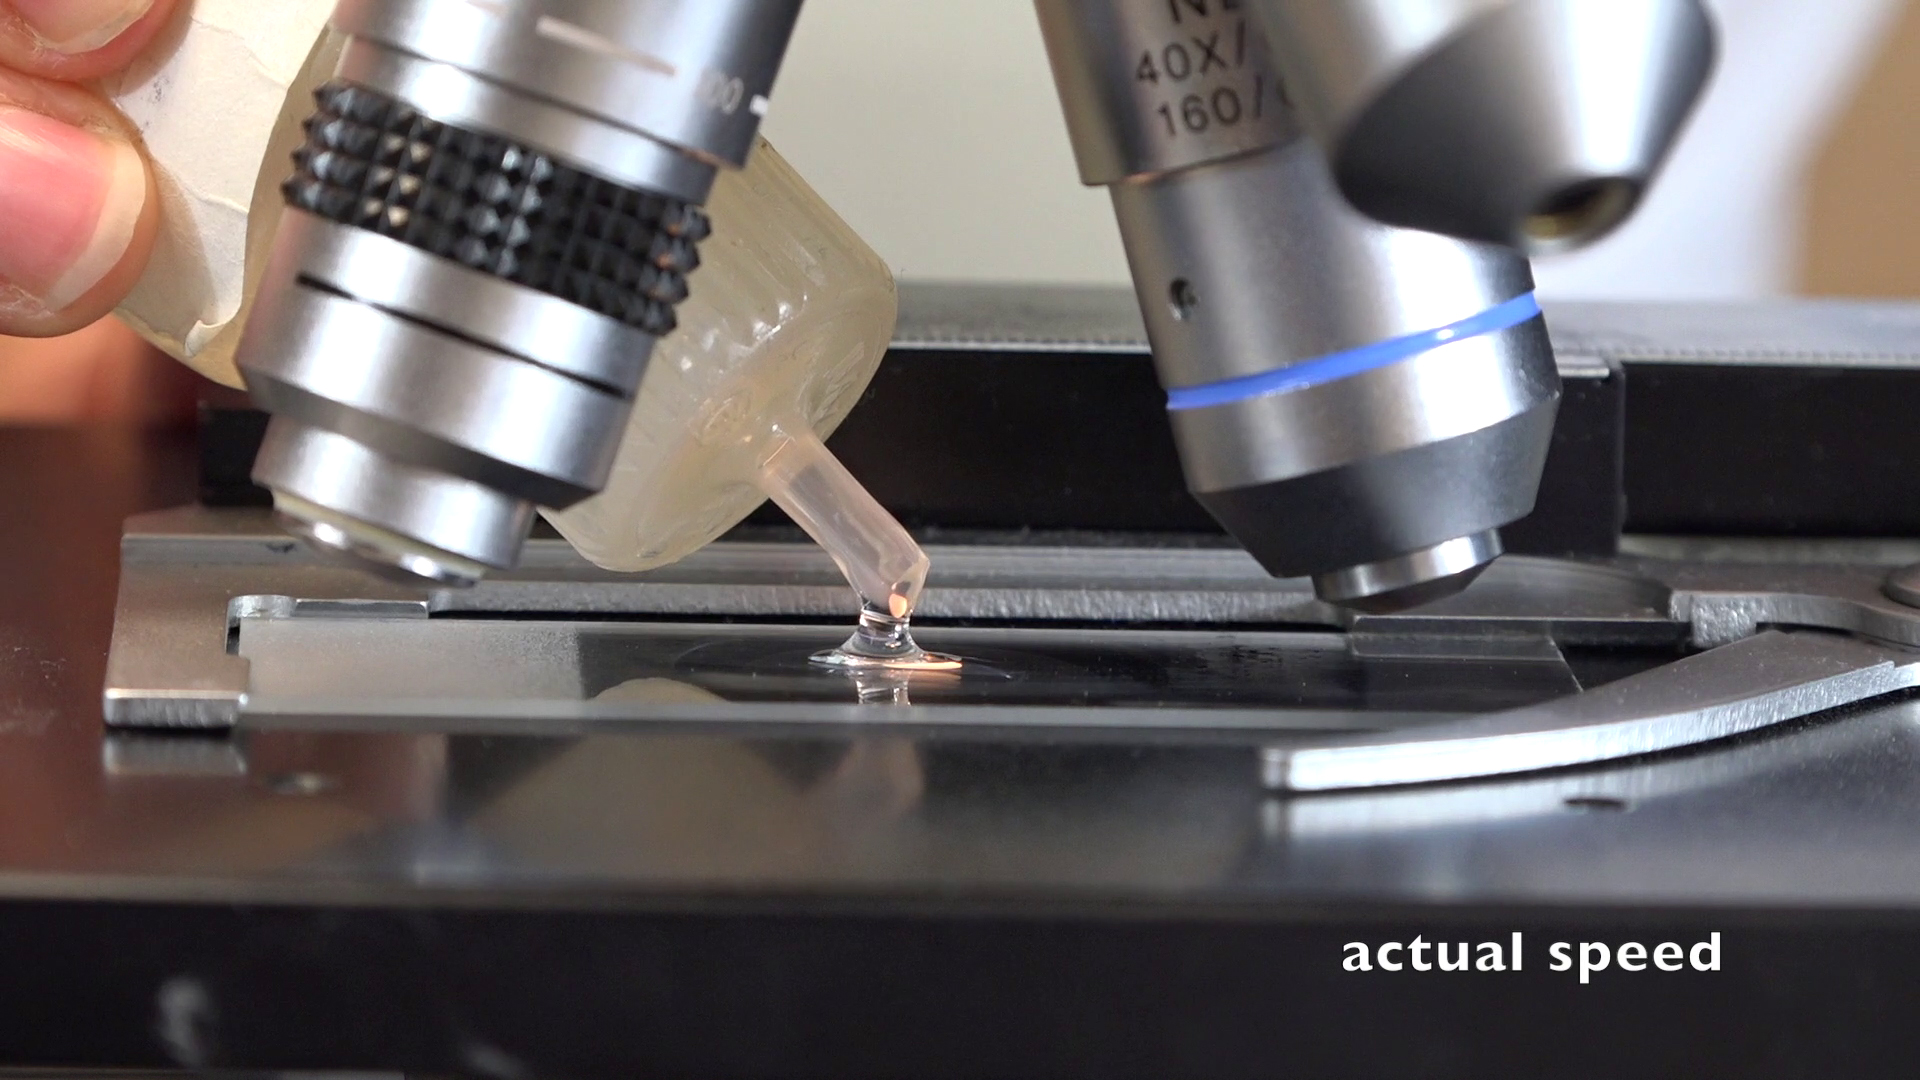
Always select the best angle and be as close to the subject to maximize your video equipment’s resolution potential. The closer you can get to the equipment without using the zoom function the more detail the camera will capture and the more clear it will look on full screen. For example, if showing how to wrap the power cord around a microscope, I should see the entire microscope and enough of the demonstrator to show the process (Figure 3). If I am pointing to a bacterial plate then the plate should fill up most of the frame. Consider shooting from the student’s point of view. Consider angles that cannot be seen during a live demonstration for all students. For example, the close up of the oil drop on a microscope slide (Figure 4) can only be seen if a student leans into the microscope to an uncomfortably close distance. Yet this is exactly what oil immersion will look like when they do it in lab. With video students can see important details like these.
Sound
Every word in the video should be audible and clear. Clearly enunciated words makes it easier for accurate captions to be generated. For this reason, a personal microphone may be needed in a noisy room. Voice over may be preferable to live audio during the demonstration. For timing purposes, we recommend that you say the audio while recording the demonstration. During editing, record the audio again for any scene where the sound is unclear. Captions should be included; YouTube can auto-generate closed captions, or other captioning services such as Amara can be used. Instructors should consult with their institutional accessibility offices to determine the best method for creating captions.
Continuity
Make sure things are not moved from angle to angle. A moving sunlight, changing clothes, and equipment appearing and disappearing can be disorienting and distracting to watch.
Editing
If shots are well planned, the sound is good, and word choice is concise then editing will be an easy task. There are many free software options available for video editing. We use iMovie to edit all of our videos. It is a simple and user intuitive software. But even simple editing software can offer a plethora of transitions between shots.
To keep transitions simple, we recommend cross dissolve or cross blur for shots where the angle is changed <30 degrees. If the frame angles change is >30 degree a transition between shots is unnecessary. Jump cuts, or video edits in which a transition is not used and the camera angle changes <30 degrees, should be avoided. A jump cut gives the illusion of time skipping. In an instruction video it can look like a poor server connection or words are being skipped. The speed of the video should be 1X; speeding up or slowing down can give the impression of a poor server connection.
Length of Video
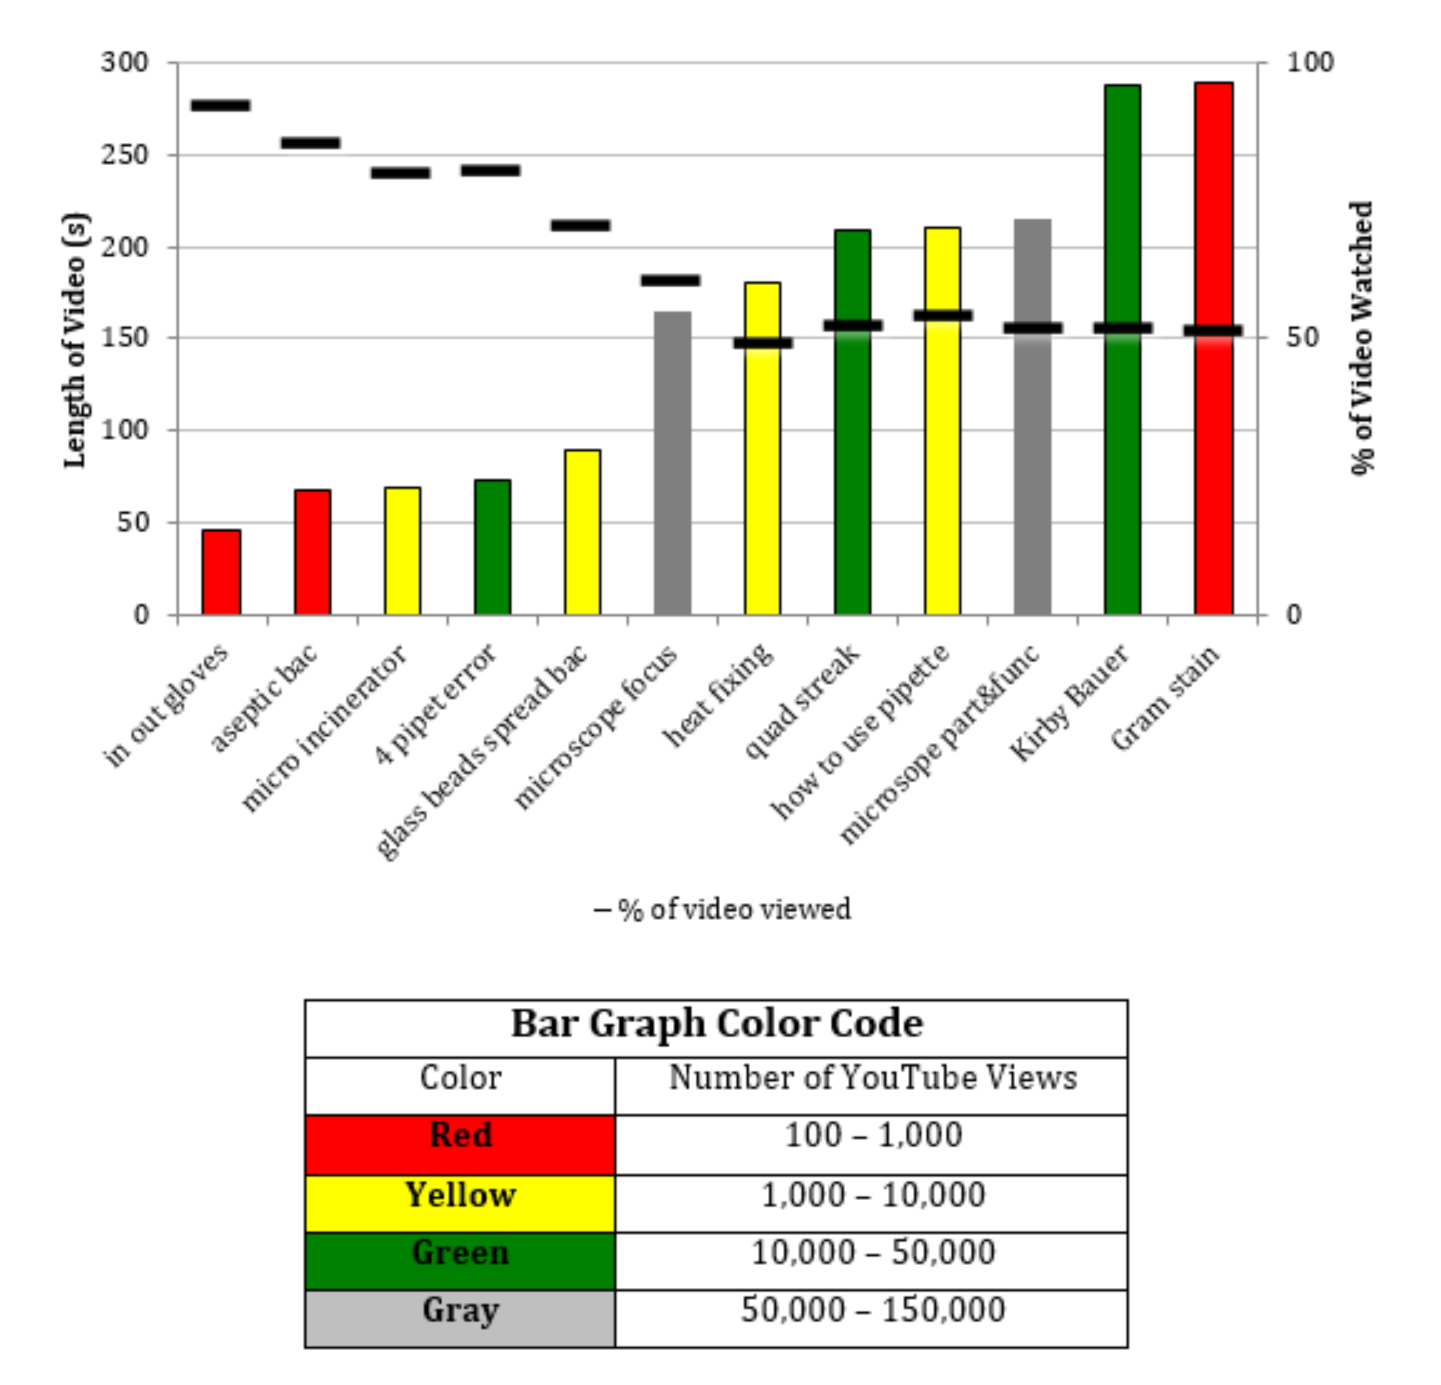
We found an inverse relationship between video length and % of a video watched. Viewers watched ~50% of our longer videos. Conversely, viewers watched ~90% of our shorter videos. This pattern holds true for videos that have 500+ or 50k+ views (Figure 5). For this reason, we recommend videos be kept under 5 minutes. For complex protocols we recommend breaking it down in to modular parts. For example, extracting bacterial DNA can be broken into: cell prep, cell lysis, and DNA extraction. Different modules can be recombined to form a new protocol series.
Video Hosting
We personally use YouTube to host our videos. Anyone who uploads a video onto YouTube is a content creator (CC). YouTube is an excellent platform for storing and presenting video demonstrations. It is free, well maintained, and always available. It is user intuitive to the viewer and the CC, and CCs have full control over who can see their videos. Finally, it offers the CC metrics to track viewership and it offers the CCs the ability to seek feedback through comments and a thumbs up/down rating system. However, instructors should check their institutional policies about approved video hosting services. Some institutions may require that videos be hosted by the institution’s learning management system (LMS). If the video is hosted on the institution’s LMS, we recommend turning on the statistics tracking in the LMS to track how many students view the video resource.
Conclusion
While making your own instructional videos for teaching may seem like a large investment in time and energy, if made correctly, the videos will facilitate learning and save time over the years. Video production also offers an enjoyable and productive distraction to traditional course prep. Well-made demonstration videos offer more equitable access to the instructor for all students, facilitate active learning, and offer continuity across multi-section courses. Most smart phone cameras are of sufficient quality to make good videos. User-friendly editing programs are available. Proper design of video learning objectives is critical to making a concise video that is more likely to be viewed completely. Correct use of framing focuses the student’s attention on the most important details. Videos made by the course instructor with the actual equipment students will use in lab reduces cognitive load for the learner and eases transition into hands-on activities. Instructors can foster inclusivity by having students or TAs as demonstrators to help students “see themselves” performing the activity. Finally, instructor control of the video content and availability ensures that the video is well suited to the course and is always available to students. We distilled several key features that contribute to making an instructional video and used these features to make many demo videos of our own. We found them to be a useful tool for our students and we hope more lab instructor will try to make their own videos using this paper as a starting point.
Scientific Teaching Themes
Active Learning
Demonstration videos can be used as part of active learning and flipped classroom instruction. On the lower end of the active learning spectrum, videos can be used as part of pre-lab activities to prepare students for lab so that more time can be spent in class using the equipment hands-on. On the higher end of the active learning spectrum, students can be provided a variety of demonstration videos to watch before lab, and then in class are provided a problem to solve. Students must select from demonstration videos which techniques or equipment to use to solve the problem. Videos can then serve as in-class refreshers for completing the assignment.
Assessment
Instructors can use YouTube metrics to determine how many times their videos are viewed, how much of the video is viewed, and when. This information gives insight into student engagement with course material and classroom preparation. YouTube ratings, in the form of comments and thumbs up/down ratings also provide feedback. Surveys can be used to measure student engagement with the video and how the video helped their learning and then videos can be re-edited to address any issue. Videos can also serve as a tool for student self-assessment. By comparing their technique to the video, students can evaluate their own learning, or by taking an ungraded online quiz over the video, students can determine if they’ve picked up critical details or need to review.
Inclusive Teaching
Videos can support inclusive teaching by allowing students to view material at their own pace. A video can be paused, slowed, zoomed in, or sped up depending on the learning personality of the student. Videos allow all students to see the technique from a close up angle that is not possible in a classroom setting. In fact, a video allows students to see more detail then they would in a classroom. Also, closed captions or a transcript can be added to videos to increase accessibility. Having former students serve as demonstrators in videos can support diversity and inclusion by using diverse demonstrators. Finally, videos allow for increased consistency across multiple-section courses.
Supporting Materials
-
S1. Video Making – Equipment
-
S2. Video Making – Shot Worksheet
References
- Rose TM. 2018. Lessons learned using a demonstration in a large classroom of pharmacy students. Am J Pharm Educ 82(9):1081–1085. doi:10.5688/ajpe6413.
- Maldarelli GA, Hartmann EM, Cummings PJ, Horner RD, Obom KM, Shingles R, Pearlman RS. 2009. Virtual Lab demonstrations improve students’ mastery of basic biology laboratory techniques. J Microbiol Biol Educ 10(1):51–57. doi:10.1128/jmbe.v10.99.
- Long T, Logan J, Waugh M. 2016. Students’ perceptions of the value of using videos as a pre-class learning experience in the flipped classroom. TechTrends 60:245–252. doi:10.1007/s11528-016-0045-4.
- Brame CJ. 2016. Effective educational videos: Principles and guidelines for maximizing student learning from video content. CBE Life Sci Educ 15(4):es6. doi:10.1187/cbe.16-03-0125.
- Croker K, Andersson H, Lush D, Prince R, Gomez S. 2010. Enhancing the student experience of laboratory practicals through digital video guides. Biosci Educ 16(1):1–13. doi:10.3108/beej.16.2.
Article Files
Login to access supporting documents
Patrick-Zhu-Video Making Tips for Laboratory Instructors.pdf(PDF | 555 KB)
S1. Video Making - Equipment.docx(DOCX | 14 KB)
S2. Video Making - Shot Worksheet.docx(DOCX | 15 KB)
- License terms

Comments
Comments
There are no comments on this resource.