Using this article as a reference rather than a walk-through of the publishing process.
Jumping to specific sections from Information for Authors to find answers for specific questions or to troubleshoot.
Getting Started
How you begin the publishing process depends on what type of resource you are publishing. If you're not sure about the difference between these types of resources, visit Information for Authors.
Find or create the project where you want to publish.
From your mini-dashboard
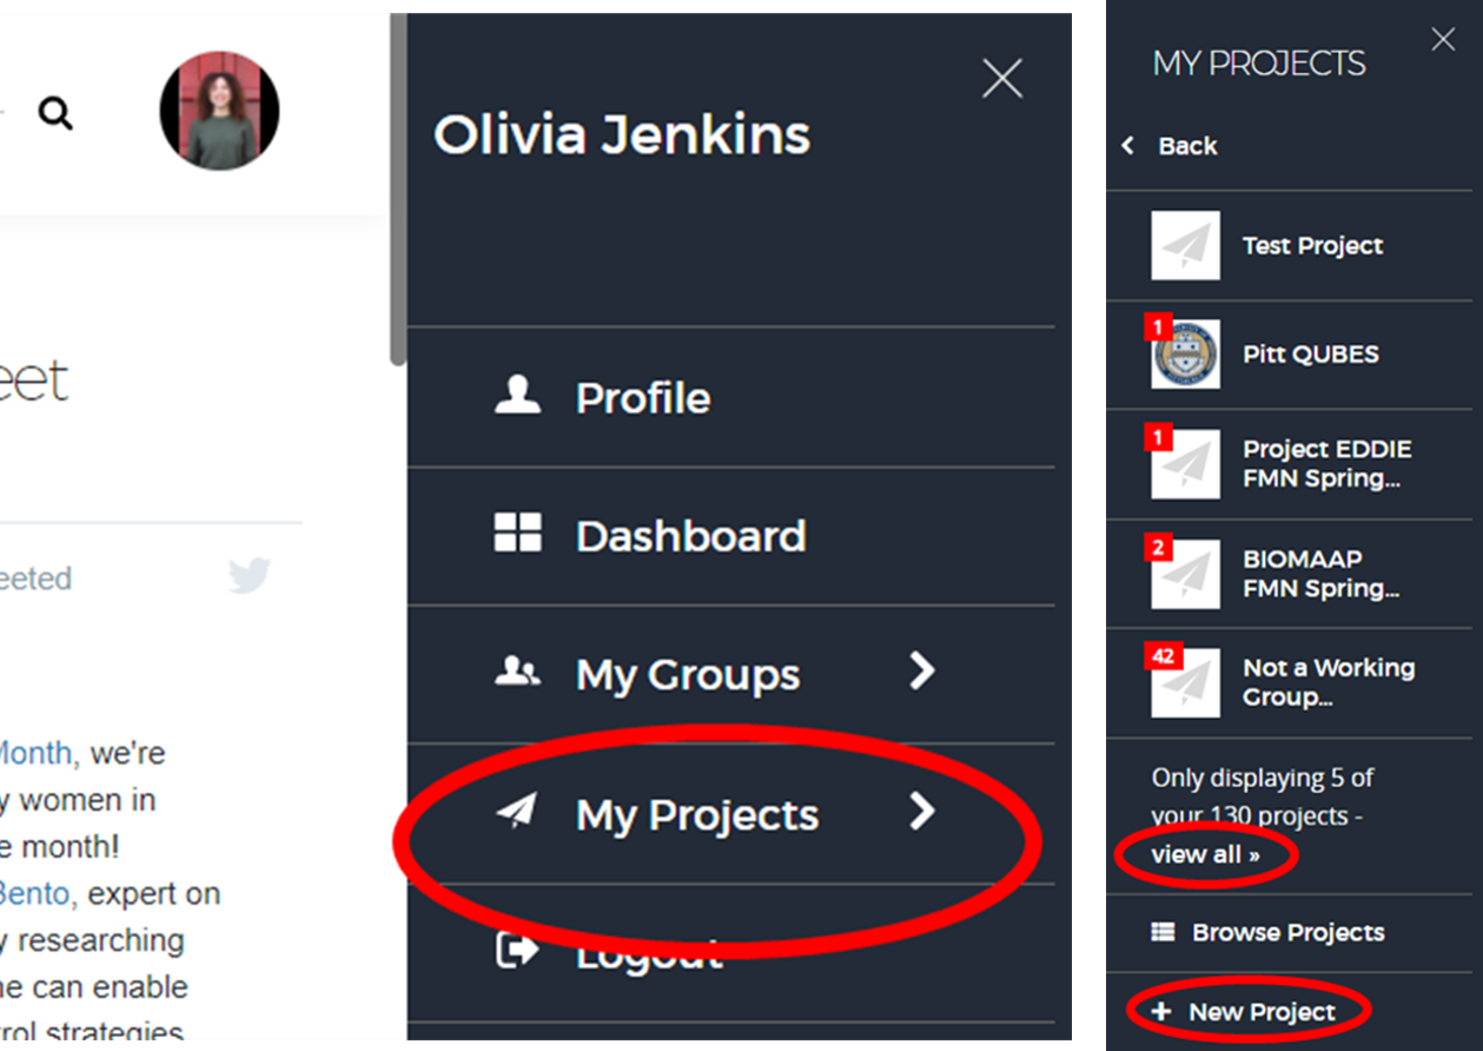
Click your icon in the upper right corner of the page.
Your mini-dashboard will appear, click the fourth item, My Projects.
This will display the last five projects you visited. If the project you want to work from is listed, click the title. If not, click View all.
From your project page select an existing project or start a new project by clicking, Add project.
From a group
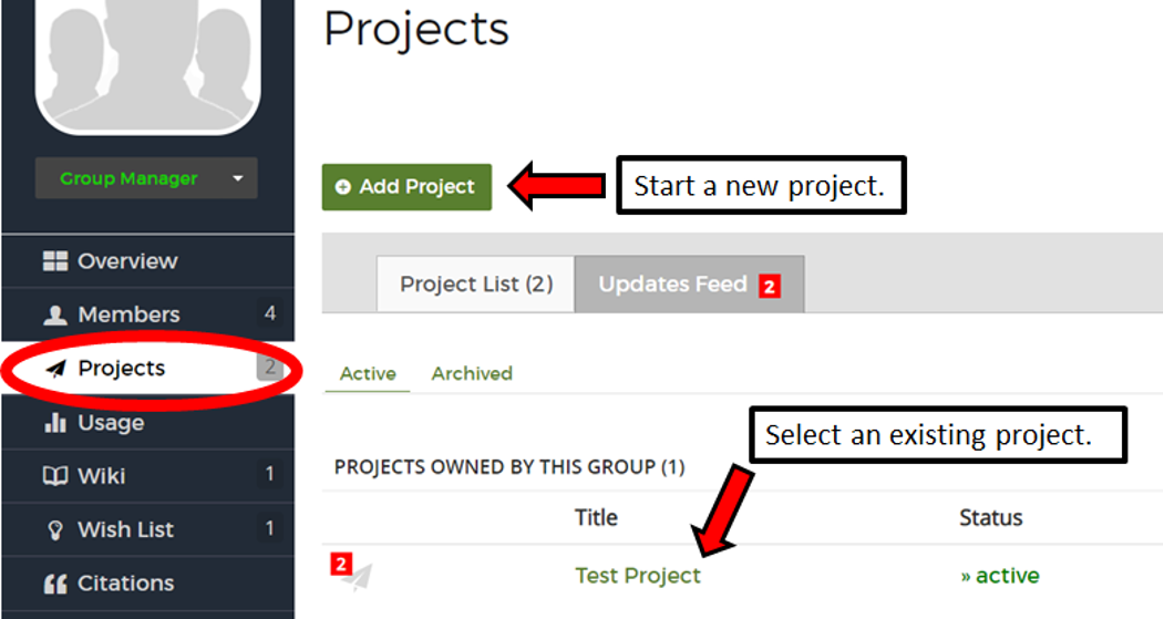
Navigate to the group.
In the left menu click Projects.
Select the project you would like to publish from.
In the project
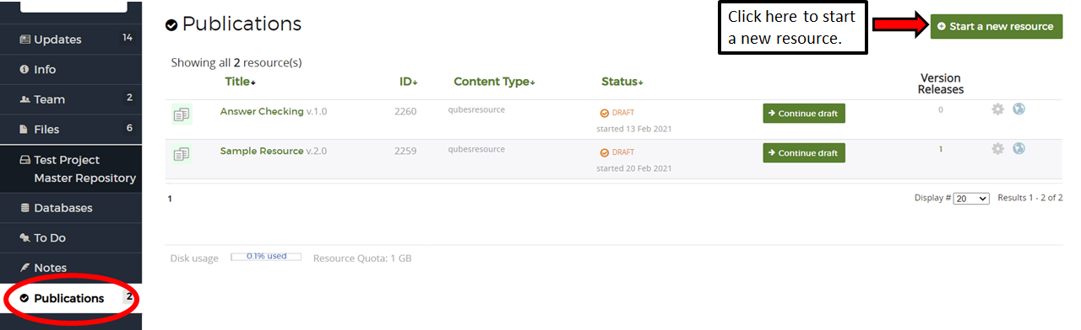
In the left menu of the project, click Publications.
Click Start a new resource.
Select "QUBES Resource" unless you have been instructed otherwise by a listed partner.
Version
Find the original resource that you would like to version.
From your dashboard: Click your icon in the upper right corner of the page. Your mini-dashboard will appear, click the second item, Dashboard.
In the left menu click Contributions.
From the Categories dropdown select Publications.
Click the title of the publication.
In the blue bar, click Manage this resource.
Under Your Options, click Start a new version.
Enter a version label and click Start new version.
Adaptation
Find the original resource you would like to adapt.
From the resource record: Click Adapt halfway down the record on the right. Select an existing project to publish from and click +Add to this.
Overview of the Publishing Process
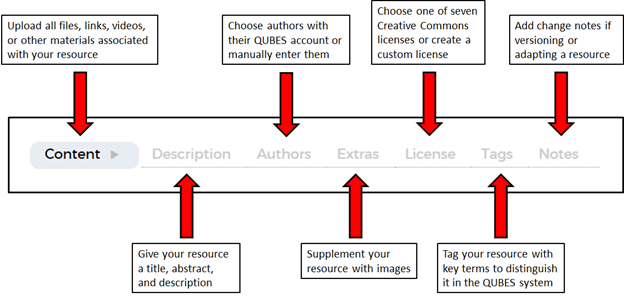
You have now started your draft resource. This landing page contains lots of key information about your resource, highlighted in the annotated screenshot below.
Content: Upload all files, links, videos, or other materials associated with your resource
Description: Give your resource a title, abstract, and description
Authors: Choose authors with their QUBES account or manually enter them
Extras: Supplement your resource with images
Licenses: Choose one of seven Creative Commons licenses or create a custom license
Tags: Tag your resource with key terms to distinguish it in the QUBES system
Notes: Add change notes if versioning or adapting a resource
Content
To begin working through the process, click the Content tab. There are several different types of content, explained further in Information for Authors.
Files
Add: Click Add a file, open the master repository by clicking the hard drive icon. Select your files. Save selection.
Edit file name: Click the pencil icon to the far right of the added file. Edit the name and save.
Remove: Click the trash can icon to the far right of the file. Scroll slightly to confirm deletion.
External Links
Add: Click Add a link, paste the link. Once it loads, Attach link.
If the link won't load, hit enter to force save.
Edit link name: Click the pencil icon to the far right of the added link. Edi the name and save.
Delete: Click the trash can icon to the far right of the link. Scroll slightly to confirm deletion.
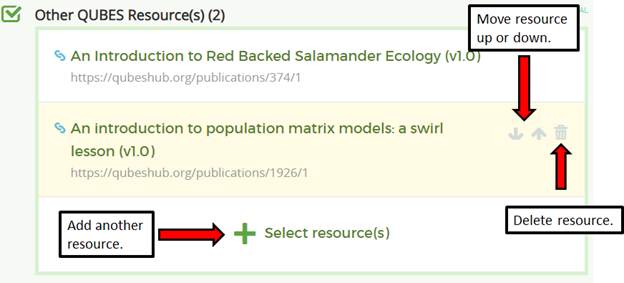
QUBES Resources
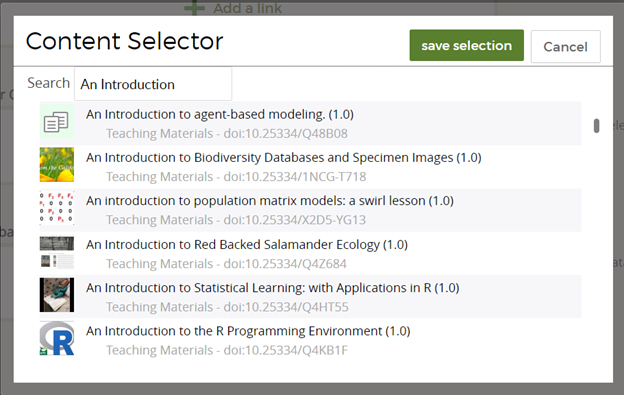
Add: Click Select a resource. Browse the list of available resources or search by typing the resource title. Select resource(s), save selection.
Reorder: Move resources up or down using the arrow icons to the far right of the resource title.
Delete: Click the trash can icon to the far right of the resource title. Scroll slightly to confirm deletion.
Description
Enter your title, abstract, and description. We suggest drafting these before publishing, guidelines and further suggestions are included in Information for Authors.
Note, if you are publishing a new version, adaptation, or an original in which you added links as content, there will be text prepopulated in these fields. Select all and delete before entering your own text.
Title
Add: Paste your title
Abstract
Add: Paste your abstract. Remember there is a 255 character limit.
Description
Add: Paste description without formatting using ctrl/cmd+shitf+v
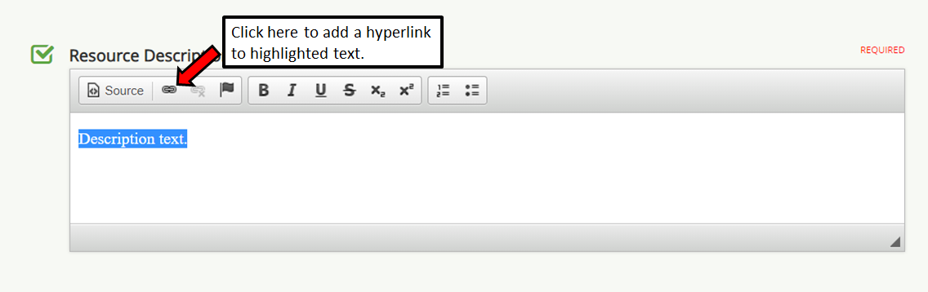
Formatting: In the description editor you can apply additional formatting to the text. The annotated image of the toolbar highlights where to add links, images, and videos. For more information on editing, visit the page editing Knowledge Base article.
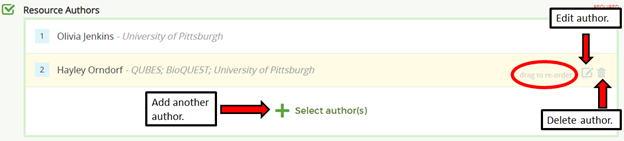
Add: Select author(s), select from project team. Save selection.
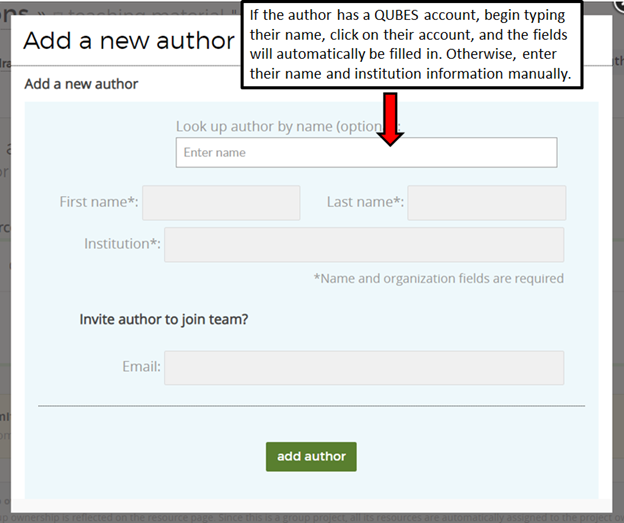
If authors are not on your project team, Select author(s), click Add an author in the bottom right of the popup.
Search their name in the QUBES database.
If they appear, select them. Edit details if needed. Add author.
If an author does not have a QUBES account, enter their name and institution. Add author.
Edit: Click the pencil icon to the far right of the author name. Make edits. Save.
Reorder: After you've added all authors, click and drag author names to reorder them.
Remove: Click the trash can icon to the far right of the author name. Scroll slightly to confirm deletion.
Group ownership: If you are working in a project not owned by a group, you can choose to add a group owner. If the project is already owned by a group, that will be noted in a blue box under the submitter information.
Add author not on team
Edit Added Authors
Extras
In the Extras section you will add an image for your resource. Do not add any files as Supplementary Materials.
Add: Under Image Gallery, click Add a file. Open the master repository by clicking the hard drive icon. Select your image file. Save selection.
Delete: Click the trash can icon to the far right of the image title. Scroll slightly to confirm deletion.
License
License selection is one of the most important steps in the publishing process. To learn more about which license to select, see the section on licensing in Information for Authors.
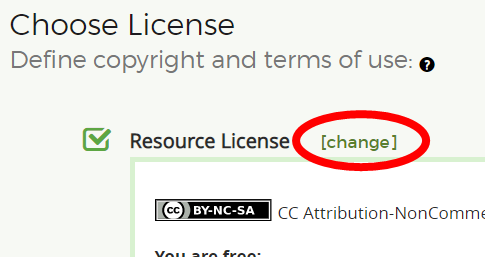
Choose: Click Choose License. Select your license, Save selection.
Change: If a resource already has a license assigned and you would like to change it, click Change and then follow the instructions for choosing.
Tags
QUBES has several tagging ontologies. More detail about each ontology is available in Information for Authors.
Ontologies: Some of these tags are required.
An arrow means there is a submenu, click the high level to open.
Check to add, uncheck to remove.
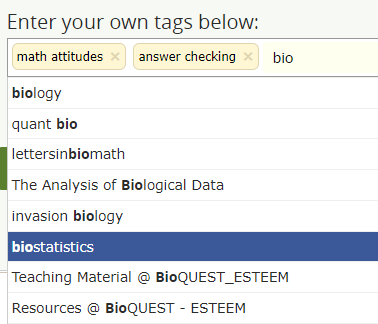
Free entry: Add keywords and tags not in the ontologies in the free entry space. Begin typing, and select an existing term if possible.
Ontologies
Free entry
Change Notes
Change notes are critical components of versions and adaptations. Learn more in Information for Authors. New resources should not have change notes.
Add: Paste change notes without formatting using ctrl/cmd+shitf+v
Formatting: In the editor you can apply additional formatting to the text. The annotated image of the toolbar highlights where to add links, images, and videos. For more information on editing, see this section of the page editing Knowledge Base article.
Review & Submit
The last step is opening the resource preview and checking for errors. The video walk-through highlights several specific elements to review for accuracy.
Preview resource page: Click View resource page to open a preview of the resource record.
Review the resource for errors. This video highlights several specific pieces to check for accuracy.
If you notice any errors return to the appropriate section, correct the mistake, and return to the review & submit page.
Bundle: Check that all files are listed. A license file and README will have been added.
DOI: All resources are assigned a DOI.
Submission settings: The default settings work well for all submissions. You can adjust the posting date if you wish.
Comments: There's no need to add comments. QUBES resources are published immediately.
Agreements: Read the Terms of Use carefully. Check the box if you agree.
Submit: Click Submit draft to publish your resource!
I'm wondering how the community is using "Datasets" vs "Teaching Materials" as a Search Category when the Publication includes both student/teacher materials as well as a dataset that the materials are built around. Currently the option is to only select one of these and not post as both. Thanks.
I think we addressed that by making the only search category "Teaching Materials". One area that we are going to work on very soon is in search and browse, which should have a much more useful interface. In particular, the user will be able to filter by Dataset and Teaching Material in order to find those teaching materials that have datasets.
I think we addressed that by making the only search category "Teaching Materials". One area that we are going to work on very soon is in search and browse, which should have a much more useful interface. In particular, the user will be able to filter by Dataset and Teaching Material in order to find those teaching materials that have datasets.


0 Like 0 Dislike
Megan A. Jones Patterson @ on
I'm wondering how the community is using "Datasets" vs "Teaching Materials" as a Search Category when the Publication includes both student/teacher materials as well as a dataset that the materials are built around. Currently the option is to only select one of these and not post as both. Thanks.
Report abuse
0 Like 0 Dislike
Drew LaMar @ on
I think we addressed that by making the only search category "Teaching Materials". One area that we are going to work on very soon is in search and browse, which should have a much more useful interface. In particular, the user will be able to filter by Dataset and Teaching Material in order to find those teaching materials that have datasets.
Report abuse