- Discoverability Visible
- Join Policy Restricted
- Created 17 Jun 2020
QB@CC FMN Bridging Mathematics and Biology
Getting Organized
Objectives
After completing this unit you will be able to:
- Organize, update, and upload resource materials to a project repository.
- Distinguish between content and descriptive information.
- Locate and upload an image for a resource.
What exactly is a QUBES resource?
"Resource" is a pretty vague word, right up there with "change." QUBES embraces the blurry definition of resources because we believe in a community-driven collection of learning and reference material. What's important is the composition of each resource, the content and the descriptive information. Different disciplines and communities have varying terms and definitions for these ideas. QUBES defines them as follows:
- Content: The essential pieces needed to implement the resource, what you will actually download, give to learners, and use as an instructor. Content includes images, described further in the next section
- Descriptive Information: Everything about the resource that isn't the actual material.
- Descriptive Information may also be referred to as "metadata" or data about data.
Consider your material from the FMN. If you were asked what it was, everything that you say about it is descriptive information. The actual components you are talking about (the data, the handout, the assessment, etc.) are the content. These distinctions are important when adapting a resource, because to make your work meaningful, you need to communicate exactly what you changed and how you changed it.
This video will walk you through several resources, highlighting the differences between content and descriptive information. Feel free to increase the playback speed by clicking the "Settings icon" in the menu and then "Playback speed."
Review the material you plan to include in your resource. Determine whether each component is content or descriptive information.
Images
An important content component is the image. The card display of resources highlights the image so it is important to select a unique and relevant image that highlights your work. If you do not select an image, a default will be added for you. Below are resources with no images (the default rotates between five images, changing with each rendering of the card).
Frayer model growth mindset
Version: 1.0
While these images are great, it's best practice to select a new image for your adaptation. Where can you find an image?! There are a few routes to take:
- If you have an image that you can legally use, like a screenshot of the material or an image you created, you can use that. You should specify the usage rights of that image in the Description.
- If you are comfortable including an attribution in your Description, you can use an openly licensed image.
- If you would like an image that is free to use without attribution, QUBES suggests searching on sites like:
- If all else fails, you can use the pre-populated image from the original. There is nothing wrong with that, but remember that when displayed as cards, it is very difficult to distinguish between multiple resources with identical images.
No matter where the image is from, it should be relevant to the material.
Find an Image
- Identify an image you can use for your resource.
- Download the image.
Getting Organized
Now that you have distinguished between content and descriptive information, you will upload materials and start adapting! The adaptation process is smoother when you are organized and have all materials (content and descriptive information) ready to go before diving in.
Best Practices on Organization
- Submit resources from a Project, a private workspace. This provides your work with a permanent home to which you can return for versioning, collaboration, or further adaptations.
- Create structure in the project repository. Projects have file repositories that can be organized using folder.
- Name folders in meaningful ways, particularly if you are collaborating with others. In FMNs, include your last name and a keyword in the folder name.
- Upload files to your folder before you start adapting.
Upload your material
This FMN's project for publishing final products is FMN QB@CC Spring 2021.
- Open your Project and open the project's Master Repository in the left menu.
- Create and name a folder in the repository.
- In the Files menu, click the folder icon to create a new folder.
- Replace "untitled" with a name for your folder.
- Click Save.
- Open your folder.
- Upload any files you identified as content to the folder.
- In the Files menu, click "Upload."
- Click to select files from your computer, or drag files into the "Click or drop file" rectangle.
- Click "Upload now."
- Complete the Status Check
Status Check
Compare your screen with the example below. Evaluate your status using the checklist.
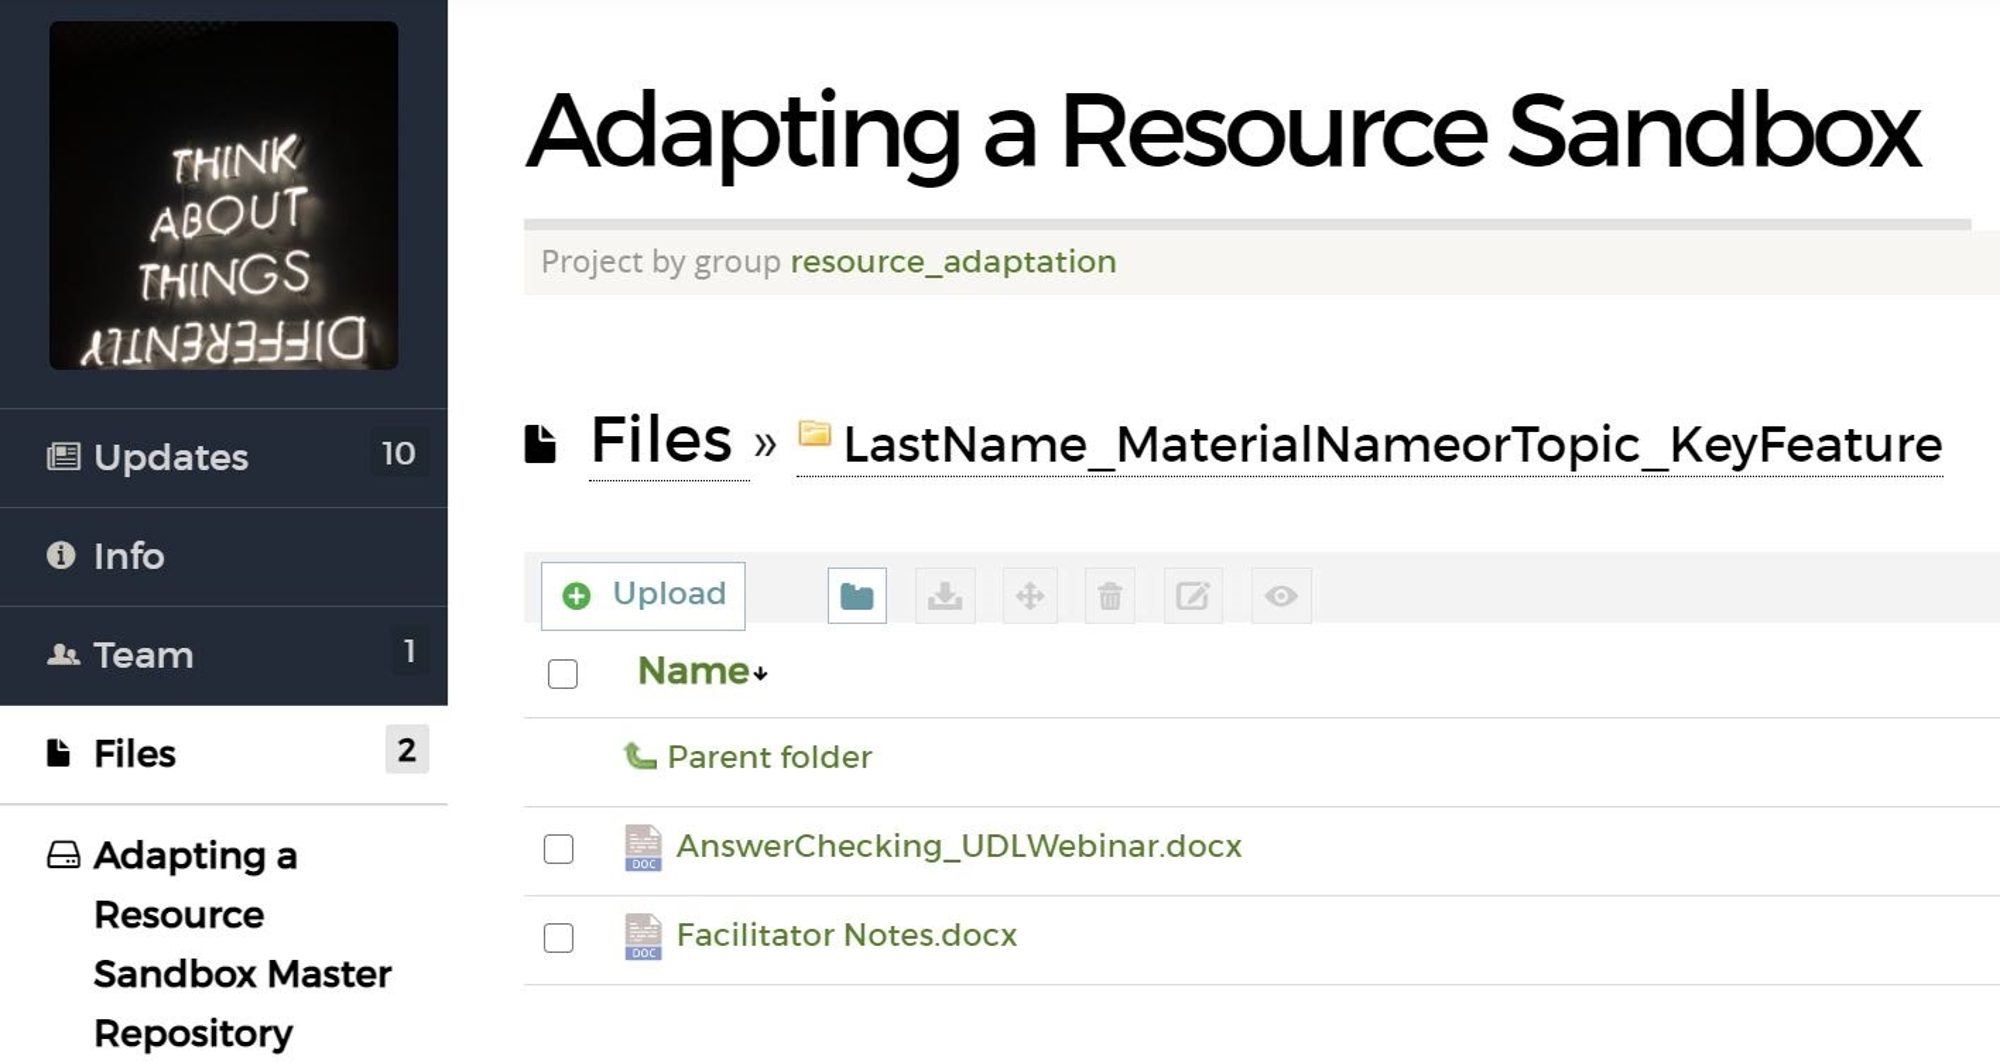
- Folder is within the FMN QB@CC Spring 2021 project repository.
- Folder name includes your last name and a keyword.
- All content files are listed within the Parent folder.